Note: In all of the HTML source code that follows, style, width and height attributes were removed to make code easier to read (and edit)
The concept is very simple: once data has been correctly submitted, use ADO.NET to save the information to the database. Most of the workload in persisting Web data to a database is ADO.NET oriented and is straightforward. However, there are two issues to be aware of:
The basic concept used in displaying data in tables is data binding. The concept is discussed fully in another chapter, but basically, controls that support the DataSource property can easily be bound to data sources such as tables, arrays, lists, etc. For example, a DataTable or a DataReader can be assigned to the DataSource property of a DataGrid. The following controls all have the DataSource property:
A repeater is used to display a collection of records from a table and apply custom formatting to the way each record is displayed. The following basic example illustrates how to use a repeater:
<%@ Page language="c#" Codebehind="Repeater.aspx.cs" AutoEventWireup="false" Inherits="DataPresentation.WebForm1" %>
<HTML>
<HEAD>
...
</HEAD>
<body MS_POSITIONING="GridLayout">
<form id="Form1" method="post" runat="server">
<asp:Repeater id="rptrCategories" runat="server">
<ItemTemplate>
<%# DataBinder.Eval(Container.DataItem, "CategoryID" ) %>
<%# DataBinder.Eval( Container.DataItem, "CategoryName" ) %>
<br>
</ItemTemplate>
</asp:Repeater>
</form>
</body>
</HTML>
using System;
using System.Data.OleDb;
using ...
namespace DataPresentation
{
public class WebForm1 : System.Web.UI.Page
{
protected System.Web.UI.WebControls.Repeater rptrCategories;
private void Page_Load(object sender, System.EventArgs e)
{
PopulateRepeater();
}
#region Web Form Designer generated code
...
#endregion
/* Helpers */
private void PopulateRepeater()
{
// Open a connection
string strConnectionString =
"Provider=Microsoft.Jet.OLEDB.4.0;
Data Source=C:\\Program Files\\Microsoft Office\\Office\\1033\\FPNWIND.MDB";
OleDbConnection conn = new OleDbConnection( strConnectionString );
conn.Open();
// Exeucte a simple query
OleDbCommand cmd = new OleDbCommand();
cmd.Connection = conn;
cmd.CommandText = "select * from Categories";
OleDbDataReader reader = cmd.ExecuteReader();
// Associate the data reader with the repeater
rptrCategories.DataSource = reader;
// Load the records from the reader into the repeater
rptrCategories.DataBind();
//
Clean up
conn.Close();
}
}
}
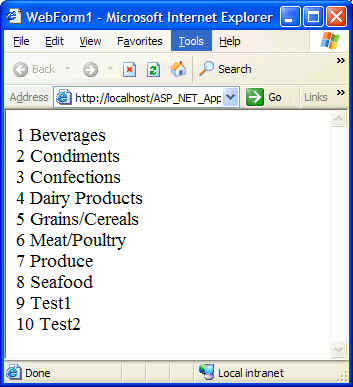
Output from the above code is shown below:
Note how DataSource and DataBind are called on the repeater to associate and load the data reader into the repeater. All controls that support binding to a data reader (or a data list or an array / list for that matter), will support some variant of DataSource and DataBind that should be called. Note that if DataSource referred to a DataReader or DataSet that had more than one table, then DataMember on the ASP.NET server control should be called to identify which table to be used within the data source.
More importantly is the repeater which is a templated data-bound control. In other words, the repeater is a data-bound list control that allows custom layout by repeating a specified template for each item to be displayed in the list (repeater). This means that there is no built-in layout or style. You have to explicitly specify the layout, formatting and tags with templated. At a minimum, every repeater must define an ItemTemplate, however, the following optional templated can be further used to customize the appearance of the repeater:
In the HTML code above, the following data-binding expression was used:
<%# DataBinder.Eval(Container.DataItem, "CategoryID" ) %>
Data binding expressions are used to create a binding between any property on an ASP.NET page (including server control properties), and a data source when the DataBind() method is called. Data binding expressiones can either be included on the value side of an attribute/value pair in the opening tag of a server control, or anywhere in the page:
<tagprefix:tagname property="<%# data-binding expression %>" runat="server"/>
or
literal text <%# data-binding expression %>
Note that all data-binding expressions, regardless of where you place them, must be contained in <%# and %> characters. DataBinder.Eval is a static method that evaluates late-bound data-binding expressions and optionally formats the result as a string. This method eliminates much of the casting that would otherwise be required to obtain the required data-type. For example, contrast the following data-binding expression which uses casting to the one that follows it:
<%# ((DataRowView)Container.DataItem)["CategoryID"] %>
<%# DataBinder.Eval(Container.DataItem, "CategoryID") %>
DataBinder.Eval is therefore particularly useful in templated server controls since often both the data row and the data field must be cast. Note that the Container part of the system refers to the control that contains that statement. In this case, the container is an instance of RepeaterItem class. The DataItem property represents one of the data items from the data source that was associated with the repeater. In the above case, the DataItem represents the CategoryID field.
The following example shows how to use optional templates supported by the repeater control. Within these templates, note how HTML was used to create a table with title fields and alternating colors. The code behind module for this HTML is the same as that for the previous example:
<%@ Page language="c#" Codebehind="Repeater2.aspx.cs" AutoEventWireup="false" Inherits="DataPresentation.Repeater2" %>
<HTML>
<HEAD>
...
</HEAD>
<body MS_POSITIONING="GridLayout">
<form id="Repeater2" method="post" runat="server">
<asp:Repeater id="rptrCategories" runat="server">
<HeaderTemplate>
<table border="1" cellpadding="2" cellspacing="1">
<tr>
<td>Category ID</td>
<td>Category Name</td>
</tr>
</HeaderTemplate>
<ItemTemplate>
<tr align="center">
<td><%# DataBinder.Eval( Container.DataItem, "CategoryID") %></td>
<td><%# DataBinder.Eval( Container.DataItem, "CategoryName" ) %></td>
</tr>
</ItemTemplate>
<AlternatingItemTemplate>
<tr align="center" bgcolor="#99ff99">
<td><%# DataBinder.Eval(Container.DataItem, "CategoryID") %></td>
<td><%# DataBinder.Eval(Container.DataItem, "CategoryName") %></td>
</tr>
</AlternatingItemTemplate>
<FooterTemplate>
</table>
</FooterTemplate>
</asp:Repeater>
</form>
</body>
</HTML>
Output from the previous code:

One problem with the previous code concern NULLs. How do you display a proper value for NULL such as 'NA', 'Unknown', or even 'No entry found'? Easy. Just use a helper function in the Code Behind module and that function within the <%# %> block:
<%# AdjustForNulls(DataBinder.Eval(Container.DataItem, "CategoryID")) %>
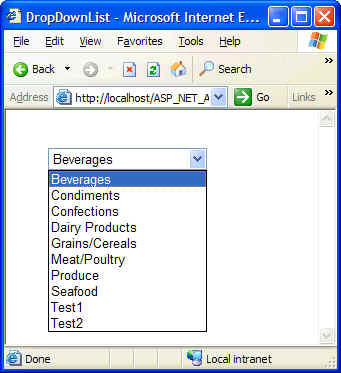
Data is bound to a DropDownList in the same exact way data was bound for the repeater. Additionally, the DropDownList control has an extra property called DataTextField which indicates which column to use if the DataSource property was set to a DataReader or DataSet. The following example illustrates:
<%@ Page language="c#" Codebehind="DropDownList.aspx.cs" AutoEventWireup="false" Inherits="DataPresentation.DropDownList" %>
<HTML>
<HEAD>
...
</HEAD>
<body MS_POSITIONING="GridLayout">
<form id="DropDownList" method="post" runat="server">
<asp:DropDownList
id="ddlCategories" runat="server"></asp:DropDownList>
</form>
</body>
</HTML>
sing System;
using System.Collections;
using System.ComponentModel;
using System.Data;
using System.Data.OleDb;
...
namespace DataPresentation
{
public class DropDownList : System.Web.UI.Page
{
protected System.Web.UI.WebControls.DropDownList ddlCategories;
private void Page_Load(object sender, System.EventArgs e)
{
GetDataReader();
}
#region Web Form Designer generated code
...
#endregion
/* Helpers */
private void GetDataReader()
{
// Open a connection
string strConnectionString = "Provider=Microsoft.Jet.OLEDB.4.0;Data
Source=C:\\...\\Office\\1033\\FPNWIND.MDB";
OleDbConnection conn = new OleDbConnection( strConnectionString );
conn.Open();
// Exeucte a simple query
OleDbCommand cmd = new OleDbCommand();
cmd.Connection = conn;
cmd.CommandText = "select * from Categories";
OleDbDataReader reader = cmd.ExecuteReader();
// Return results
ddlCategories.DataSource = reader;
ddlCategories.DataTextField = "CategoryName";
ddlCategories.DataBind();
//
Clean up
conn.Close();
}
}
}
Output is shown below:
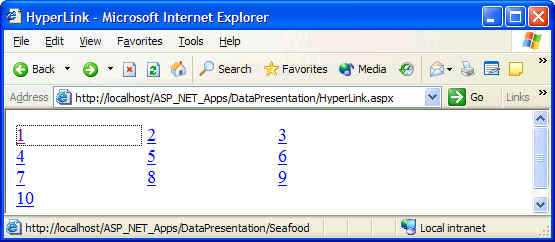
Various controls such as Button, Label, Image, and HyperLink do not have a DataSource property. This means that you cannot bind these controls directly to a data source like the DataReader or DataSet. However, you can indirectly bind these controls to a data source by embedding these controls inside other controls that do support data binding. In the following example, a HyperLink control is embedded with a Repeater control to show the IDs of various categories, in the IE screen shot note that when one of the hyperlinks is highlighted, the associated URL is shown in the IE status/progress bar.
<%@ Page language="c#" Codebehind="HyperLink.aspx.cs" AutoEventWireup="false" Inherits="DataPresentation.HyperLink" %>
<HTML>
<HEAD>
...
</HEAD>
<body MS_POSITIONING="GridLayout">
<form id="HyperLink" method="post" runat="server">
<asp:Repeater id="Repeater1" runat="server">
<ItemTemplate>
<asp:HyperLink id="hlCategories" runat="server"
NavigateUrl='<%# DataBinder.Eval( Container.DataItem, "CategoryName" )%>'>
< %# DataBinder.Eval( Container.DataItem, "CategoryID") %>
</asp:HyperLink>
</ItemTemplate>
</asp:Repeater>
</form>
</body>
</HTML>
The DataList control is similar to the Repeater control in that it allows you to display and format database data. However, the DataList control has a lot more advanced properties for controlling layout and format. The DataList control is a data-bound control that displays items using templates. Just like the Repeater, The DataList control is used to display a singular column of data unless you define a table inside the appropriate templates as done for the repeater in this example.
By default, a DataList control displays data in an HTML table. This means that you can modify the appearance of this table by assigning values to the relevant properties such as Cellpadding, Cellspacing and GridLines properties. A typical DataList declaration might look like the following:
<asp:DataList id="dsNames" runat="server" CellPadding="2" CellSpacing="2" GridLines="Both"></asp:DataList>
The contents of a DataList control are manipulated using templates. This means that in order to display elements in the DataList, an appropriate template must be used. Further, the actual appearance of the template can be customized by setting properties for the associated style for each kind of tempalte. The DataList control supports the following templates and styles::
| Template | Meaning |
| HeaderTemplate FooterTempalte |
If defined, provides content and layout for the header/footer section of the control. The FooterStyle/HeaderStyle is used to customize the style. |
| ItemTemplate | Required template to provide content and layout for items in the control. The ItemStyle is used to customize the style. |
| AlternatingItemTemplate | If defined, provides content and layout for alternating items in the control. The AlternatingItemStyle is used to customize the style. |
| SeparatorTemplate | If defined, provides content and layout for the separator between items in the control. The SeparatorStyle is used to customize the style. |
| SelectedItemTemplate | If defined, provides content and layout for the currently selected item in the control. The SelectedItemStyle is used to customize the style. |
| EditItemTemplate | If defined, provides content and layout for the item currently being edited in the control. The EditItemStyle is used to customize the style. |
The DataList control has many features which will be illustrated in code that follows. Some of these common features are:
For example, certain controls like Button, ImageButton, and LinkButton support a property called Command, and if you display a Button in a DataList control and set the Button's Command property to Edit, then whenever the button is clicked, the OnEditCommand event of the containing DataList control will be fired.
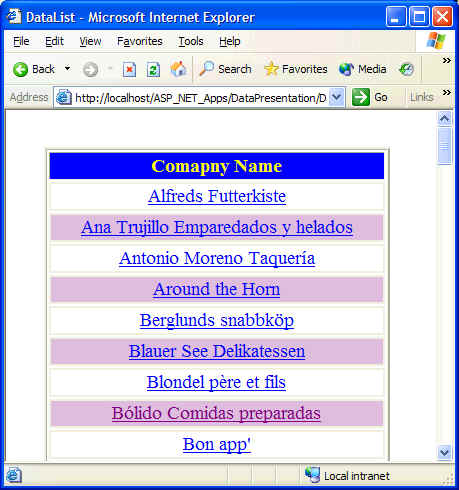
The following example illustrates a very basic DataList control:
/* Code behind */
// Open a connection to the database ...
// Return results
DataList1.DataSource = reader;
DataList1.DataBind();
<%@ Page language="c#" Codebehind="DataList.aspx.cs" AutoEventWireup="false" Inherits="DataPresentation.DataList" %>
<HTML>
<HEAD>
...
</HEAD>
<body MS_POSITIONING="GridLayout">
<form id="DataList" method="post" runat="server">
<asp:DataList id="DataList1"
runat="server" CellPadding="2" CellSpacing="2"
GridLines="Both"
BorderStyle="Ridge"
BorderWidth="3px" RepeatColumns="1" BackColor="White">
<!-- Styles to customize appearance of related tempalte -->
<HeaderStyle Font-Bold="True" HorizontalAlign="Center"
ForeColor="Yellow" BackColor="Blue"></HeaderStyle>
<AlternatingItemStyle BackColor="Thistle"></AlternatingItemStyle>
<SeparatorStyle BorderWidth="1px" BorderStyle="Dotted" BorderColor="Black"></SeparatorStyle>
<ItemStyle HorizontalAlign="Center" BorderWidth="2px"></ItemStyle>
<!-- Actual templates -->
<HeaderTemplate> Comapny Name </HeaderTemplate>
<ItemTemplate>
<%# DataBinder.Eval( Container.DataItem, "CompanyName" ) %>
</ItemTemplate>
</asp:DataList>
</form>
</body>
</HTML>

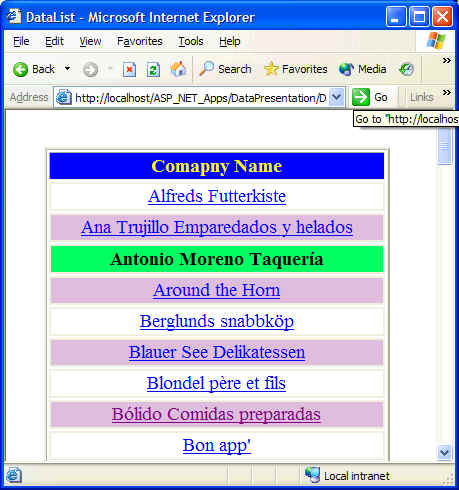
The DataList control has a template called SelectedItemTemplate which controls how a selected item in the DataList control should appear. This template is usually used with the OnItemCommand event as follows: Create a handler for the OnItemCommand event so that when an item in the DataList control is clicked, the OnItemCommand handler will be called to assign the index of the item that was clicked to the SelectedIndex property of the DataList control. When the DataList control is displayed again on the user's screen, the item in the DataList control with the SelectedIndex property will be formatted with the SelectedItemTemplate template rather than the normal ItemTemplate template.
Note the following:
using System;
using System.Data;
using System.Data.OleDb;
...
public class DataList : System.Web.UI.Page
{
/* Data members */
protected System.Web.UI.WebControls.DataList DataList1;
private void Page_Load(object sender, System.EventArgs e)
{
GetDataReader();
}
#region Web Form Designer generated code
override protected void OnInit(EventArgs e)
{
InitializeComponent();
base.OnInit(e);
}
private void InitializeComponent()
{
this.DataList1.ItemCommand += new System.Web.UI.WebControls.DataListCommandEventHandler(this.DataList1_ItemCommand);
this.Load += new
System.EventHandler(this.Page_Load);
}
#endregion
/* Helpers */
private void GetDataReader()
{
// Open a connection
string strConnectionString = "Provider=Microsoft.Jet.OLEDB.4.0;Data Source=C:\\Program
Files\\...\\1033\\FPNWIND.MDB";
OleDbConnection conn = new OleDbConnection( strConnectionString );
conn.Open();
// Exeucte a simple query
OleDbCommand cmd = new OleDbCommand();
cmd.Connection = conn;
cmd.CommandText = "select * from Customers";
OleDbDataReader reader = cmd.ExecuteReader();
// Return results
DataList1.DataSource = reader;
DataList1.DataBind();
// Clean up
conn.Close();
}
/* This is the important bit.
DataListCommandEventArgs can also be used to pass additional
information as requried. See note below figures. */
public void DataList1_ItemCommand(object source, System.Web.UI.WebControls.DataListCommandEventArgs e)
{
// Get index of selected item
DataList1.SelectedIndex =e.Item.ItemIndex;
// Get data
GetDataReader();
}
}
}
<%@ Page language="c#" Codebehind="DataList.aspx.cs" AutoEventWireup="false" Inherits="DataPresentation.DataList" %>
...
<form id="DataList" method="post" runat="server">
<asp:datalist id="DataList1" runat="server"
BackColor="White" RepeatColumns="1" BorderWidth="3px"
BorderStyle="Ridge"
GridLines="Both" CellSpacing="2" CellPadding="2">
<!-- Styles
-->
<HeaderStyle Font-Bold="True" HorizontalAlign="Center" ForeColor="Yellow" BackColor="Blue"></HeaderStyle>
<AlternatingItemStyle BackColor="Thistle"></AlternatingItemStyle>
<SeparatorStyle BorderWidth="1px" BorderStyle="Dotted" BorderColor="Black"></SeparatorStyle>
<ItemStyle HorizontalAlign="Center" BorderWidth="2px"></ItemStyle>
<SelectedItemStyle BackColor="#00ff66"></SelectedItemStyle>
<HeaderTemplate>
Comapny Name
</HeaderTemplate>
<SelectedItemTemplate>
<b><%# DataBinder.Eval( Container.DataItem, "CompanyName" ) %></b>
</SelectedItemTemplate>
<ItemTemplate>
<asp:LinkButton Runat="server">
<%# DataBinder.Eval( Container.DataItem, "CompanyName" ) %>
</asp:LinkButton>
</ItemTemplate>
</asp:datalist></form>
</body>
As a side note, the LinkButton has an optional property called CommandArgument that can be used to pass along to the command handle any extra information. In this case, we could, for example, pass the address of the company. This information can then be captured by server-side code by looking in DataListCommandEventArgs parameter of the servers-side event handler.
Another useful trick is the DataList DataKeyField property which is usually assigned the name of the primary key field for the DataSource property. After the DataKeyField property is set, a DataKeys collection that contains the values of the primary keys is automatically created for the DataList. For example, the ItemCommand handler presented previously could be:
public void DataList1_ItemCommand(object source, System.Web.UI.WebControls.DataListCommandEventArgs e)
{
// Get index of selected item
DataList1.SelectedIndex = e.Item.ItemIndex;
// Get the associated primary key
int nID = DataList1.DataKeys.Item( e.Item.ItemIndex );
// Get data
GetDataReader();
}
<%@ Page language="c#" Codebehind="DataList.aspx.cs"
AutoEventWireup="false" Inherits="DataPresentation.DataList" %>
...
<asp:datalist id="DataList1" runat="server" DataKeyField="CustomerID"
...
You can edit items in a DataList control by using the EditItemTemplate template. See MSDN for details.
The DataGrid control is the most feature rich (and complicated) control included with ASP.NET. Despite its complexity, when it is used to display simple data, it is actually easier that the Repeater or DataList controls. The DataGrid control is generall used to display and format database tables. The DataGrid control can also be used to edit items in the displayed table. However, the DataGrid control has some advanced features such as sorting and paging through data.
To better understand how to use the DataGrid, study the following code bae and note comments especially those relating to the various types of columns that can be added to the grid:
<!-- Use this DataGrid tag to
generate a grid that displays all columns in the data source. If
AutoGenerateColumns is true, then all columns are displayed, else the user needs
to use the other <asp:DataGrid> tag to selectively choose which columns to
display. The style templates can then be used to control how the grid should
look like -->
<asp:DataGrid id="programmaticID"
DataSource='<%# DataBindingExpression %>'
AllowPaging="True|False"
AllowSorting="True|False"
AutoGenerateColumns="True"
BackImageUrl="url"
CellPadding="pixels"
CellSpacing="pixels"
DataKeyField="DataSourceKeyField"
GridLines="None|Horizontal|Vertical|Both"
HorizontalAlign="Center|Justify|Left|NotSet|Right"
PagedDataSource
PageSize="ItemCount"
ShowFooter="True|False"
ShowHeader="True|False"
VirtualItemCount="ItemCount"
OnCancelCommand="OnCancelCommandMethod"
OnDeleteCommand="OnDeleteCommandMethod"
OnEditCommand="OnEditCommandMethod"
OnItemCommand="OnItemCommandMethod"
OnItemCreated="OnItemCreatedMethod"
OnPageIndexChanged="OnPageIndexChangedMethod"
OnSortCommand="OnSortCommandMethod"
OnUpdateCommand="OnUpdateCommandMethod"
runat="server" >
<AlternatingItemStyle ForeColor="Blue"/>
<EditItemStyle BackColor="Yellow"/>
<FooterStyle BorderColor="Gray"/>
<HeaderStyle BorderColor="Gray"/>
<ItemStyle Font-Bold="True"/>
<PagerStyle Font-Name="Ariel"/>
<SelectedItemStyle BackColor="Blue"/>
</asp:DataGrid>
or
<!-- Use this DataGrid tag to
generate a grid to selectively control which columns to display (note that
AutoGenerateColumns is false) -->
<asp:DataGrid id="programmaticID"
DataSource='<%# DataBindingExpression %>'
AutoGenerateColumns="False"
(other properties)
runat="server" >
<AlternatingItemStyle ForeColor="Blue"/>
<EditItemStyle BackColor="Yellow"/>
<FooterStyle BorderColor="Gray"/>
<HeaderStyle BorderColor="Gray"/>
<ItemStyle Font-Bold="True"/>
<PagerStyle Font-Name="Ariel"/>
<SelectedItemStyle BackColor="Blue"/>
<Columns>
<asp:BoundColumn
DataField="DataSourceField"
DataFormatString="FormatString"
FooterText="FooterText"
HeaderImageUrl="url"
HeaderText="HeaderText"
ReadOnly="True|False"
SortExpression ="DataSourceFieldToSortBy"
Visible="True|False"
FooterStyle-property="value"
HeaderStyle-property="value"
ItemStyle-property="value"/>
<asp:ButtonColumn
ButtonType="LinkButton|PushButton"
Command="BubbleText"
DataTextField="DataSourceField"
DataTextFormatString="FormatString"
FooterText="FooterText"
HeaderImageUrl="url"
HeaderText="HeaderText"
ReadOnly="True|False"
SortExpression="DataSourceFieldToSortBy"
Text="ButtonCaption"
Visible="True|False"/>
<asp:EditCommandColumn
ButtonType="LinkButton|PushButton"
CancelText="CancelButtonCaption"
EditText="EditButtonCaption"
FooterText="FooterText"
HeaderImageUrl="url"
HeaderText="HeaderText"
ReadOnly="True|False"
SortExpression="DataSourceFieldToSortBy"
UpdateText="UpdateButtonCaption"
Visible="True|False"/>
<asp:HyperLinkColumn
DataNavigateUrlField="DataSourceField"
DataNavigateUrlFormatString="FormatExpression"
DataTextField="DataSourceField"
DataTextFormatString="FormatExpression"
FooterText="FooterText"
HeaderImageUrl="url"
HeaderText="HeaderText"
NavigateUrl="url"
ReadOnly="True|False"
SortExpression="DataSourceFieldToSortBy"
Target="window"
Text="HyperLinkText"
Visible="True|False"/>
<asp:TemplateColumn FooterText="FooterText"
HeaderImageUrl="url"
HeaderText="HeaderText"
ReadOnly="True|False"
SortExpression="DataSourceFieldToSortBy"
Visible="True|False">
<HeaderTemplate>
Header template HTML
</HeaderTemplate >
<ItemTemplate>
ItemTemplate HTML
</ItemTemplate>
<EditItemTemplate>
EditItem template HTML
</EditItemTemplate>
<FooterTemplate>
Footer template HTML
</FooterTemplate>
</asp:TemplateColumn>
</Columns>
</asp:DataGrid>
The following basic example shows how to use the DataGrid control and display selected columns:
<%@ Page language="c#" Codebehind="DataGrid_Basic.aspx.cs" AutoEventWireup="false" Inherits="DataPresentation.DataGrid_Basic" %>
<HTML>
...
<body MS_POSITIONING="GridLayout">
<form id="DataGrid_Basic" method="post" runat="server">
<asp:DataGrid id="DataGrid1" AutoGenerateColumns="False"
runat="server" BorderColor="White"
BorderStyle="Ridge"
BorderWidth="2px" BackColor="White" CellPadding="3"
GridLines="None" CellSpacing="1">
<SelectedItemStyle Font-Bold="True" ForeColor="White" BackColor="#9471DE"></SelectedItemStyle>
<ItemStyle ForeColor="Black" BackColor="#DEDFDE"></ItemStyle>
<HeaderStyle Font-Bold="True" ForeColor="#E7E7FF" BackColor="#4A3C8C"></HeaderStyle>
<FooterStyle ForeColor="Black" BackColor="#C6C3C6"></FooterStyle>
<PagerStyle HorizontalAlign="Right" ForeColor="Black" BackColor="#C6C3C6"></PagerStyle>
<Columns>
<asp:BoundColumn HeaderText="Customer ID" DataField="CustomerID"
Visible=True></asp:BoundColumn>
<asp:BoundColumn HeaderText="Company Name" DataField="CompanyName"
Visible=True></asp:BoundColumn>
<asp:BoundColumn HeaderText="Contact Name" DataField="ContactName"Visible=True></asp:BoundColumn>
<asp:BoundColumn HeaderText="Contact Title" DataField="ContactTitle"Visible=False></asp:BoundColumn>
</Columns>
</asp:DataGrid>
</form>
</body>
</HTML>
/* Code behind module: get a data
reader from the database and bind to the data grid */
...
DataGrid1.DataSource = reader;
DataGrid1.DataBind();
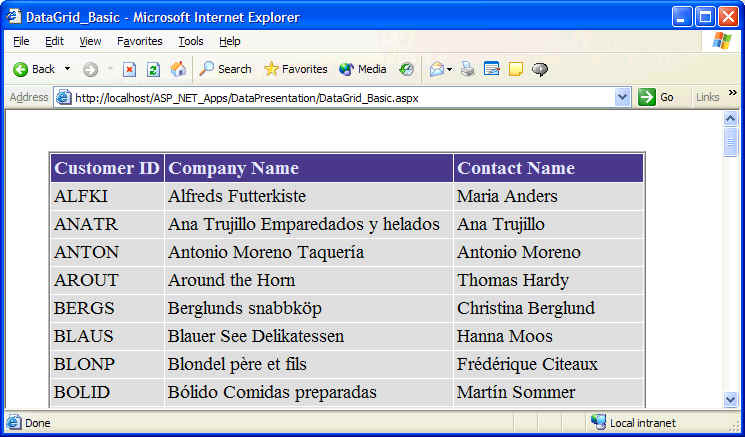
In the HTML code above, note the use of AutoGenerateColumns: when this value is set to true (the default), all columns in the data source that was bound to the DataGrid will be displayed. To selectively control which columns to display, set AutoGenerateColumns to false and explicitly specify the columns you want to show using the <asp:BoundColumn> tag.
In the HTML code also note that the 'Contact Title' column is made invisible. To show that fourth column, we could add some button called 'Show Details', that when clicked, will call a function on the server-side code behind module to iterate through all bound columns and set their visible property to true
private void ShowAllColumns()
{
int nColCount = DataGrid1.Columns.Count;
for (int i = 0; i < nColCount; i++)
DataGrid1.Columns[i].Visible = true;
}
private void btnShowDetails_Click(object sender, System.EventArgs e)
{
ShowAllColumns();
}
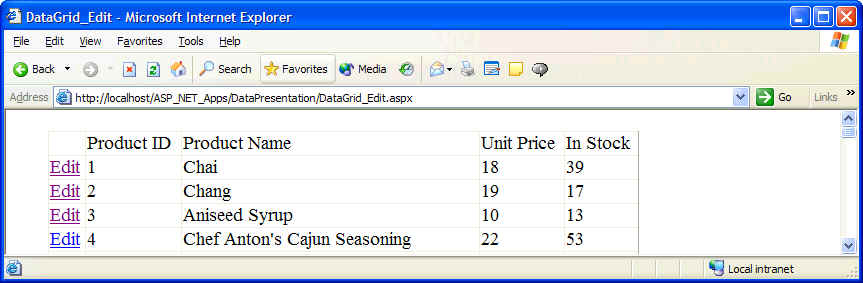
One of the common approaches to edit data in a DataGrid is to use an Edit button (EditCommandColumn) for each row in the DataGrid. The user clicks on the button and the DataGrid will be redisplayed in Edit mode. When the row is in edit mode, the Edit button is automatically replaced by two other buttons: Update and Cancel. Most of the work to add the EditCommandColumn for each row can be done automatically by selecting Property Builder menu option from the DataGrid context menu. However, the buttons will need to be hooked to an event handler that need to operate as follows:
<%@ Page language="c#" Codebehind="DataGrid_Edit.aspx.cs" AutoEventWireup="false" Inherits="DataPresentation.DataGrid_Edit" %>
<HTML>
...
<body MS_POSITIONING="GridLayout">
<form id="DataGrid_Edit" method="post" runat="server">
<asp:DataGrid id="dgProducts"
AutoGenerateColumns="False" runat="server">
<Columns>
<asp:EditCommandColumn
ButtonType="LinkButton" UpdateText="Update" CancelText="Cancel"
EditText="Edit"/>
<asp:BoundColumn DataField="ProductID" HeaderText="Product ID"></asp:BoundColumn>
<asp:BoundColumn DataField="ProductName" HeaderText="Product Name"></asp:BoundColumn>
<asp:BoundColumn DataField="UnitPrice" HeaderText="Unit Price"></asp:BoundColumn>
<asp:BoundColumn DataField="UnitsInStock" HeaderText="In Stock"></asp:BoundColumn>
</Columns>
</asp:DataGrid>
</form>
</body>
</HTML>
using System;
using System.Data.OleDb;
...
namespace DataPresentation
{
public class DataGrid_Edit : System.Web.UI.Page
{
protected System.Web.UI.WebControls.DataGrid dgProducts;
private void Page_Load(object sender, System.EventArgs e)
{
PopulateDataGrid();
}
#region Web Form Designer generated code
override protected void OnInit(EventArgs e)
{
InitializeComponent();
base.OnInit(e);
}
private void InitializeComponent()
{
dgProducts.CancelCommand += new
DataGridCommandEventHandler(this.dgProducts_CancelCommand);
dgProducts.EditCommand += new
DataGridCommandEventHandler(this.dgProducts_EditCommand);
dgProducts.UpdateCommand += new
DataGridCommandEventHandler(this.dgProducts_UpdateCommand);
Load += new
System.EventHandler(this.Page_Load);
}
#endregion
/* Helpers */
private void PopulateDataGrid()
{
// Open a connection
...
// Return results
dgProducts.DataSource = reader;
dgProducts.DataBind();
// Clean up
conn.Close();
}
private void dgProducts_EditCommand(object source,
DataGridCommandEventArgs e)
{
dgProducts.EditItemIndex = e.Item.ItemIndex;
PopulateDataGrid();
}
private void dgProducts_CancelCommand(object source,
DataGridCommandEventArgs e)
{
dgProducts.EditItemIndex = -1;
PopulateDataGrid();
}
private void dgProducts_UpdateCommand(object source,
DataGridCommandEventArgs e)
{
// Perform updates to the the data source
...
dgProducts.EditItemIndex = -1;
PopulateDataGrid();
}
}
}

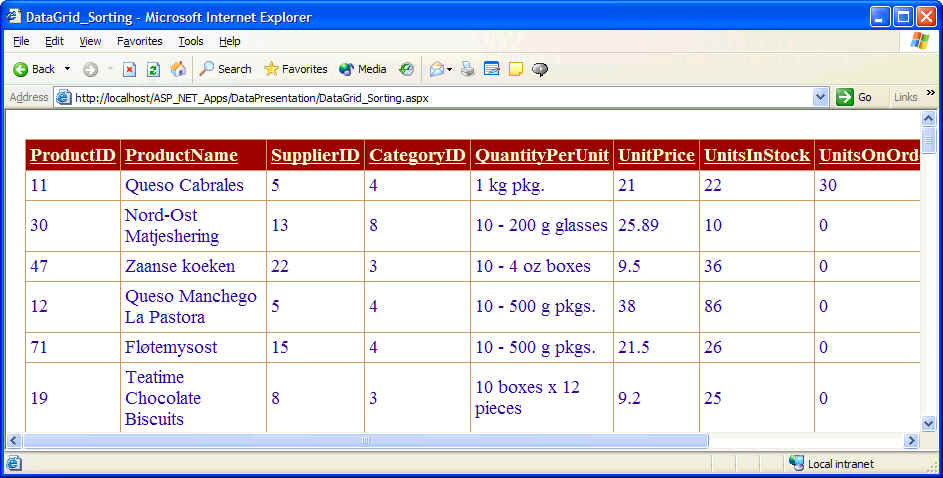
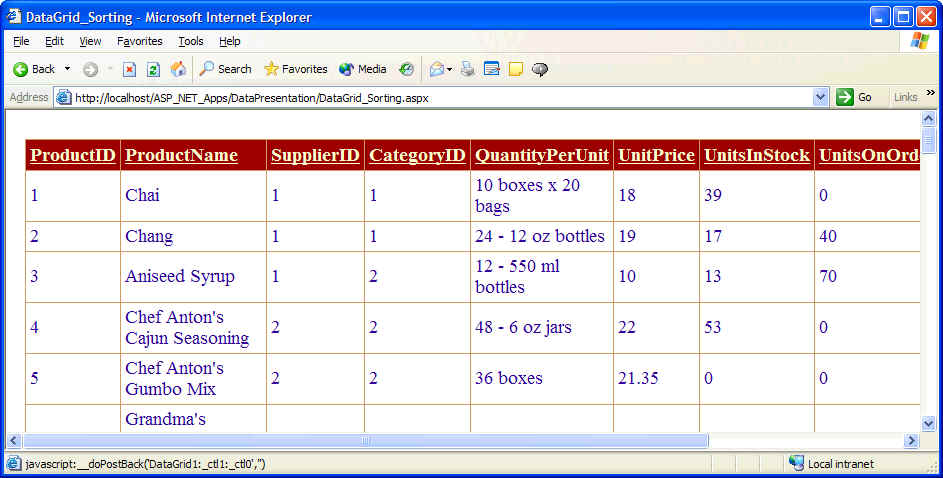
The DataGrid control has a property called AllowSorting that allows you to sort its rows. However, note that the DataGrid control does not contain the actual logic to perform sorting - you must add the code yourself. However, when AllowSorting property is set to true, it will display the appropriate links for sorting columns, but more importantly, it will raise the OnSortCommand event whose handler should perform the actual sorting. The typical action of the handler is to sort data and then rebind the sorted data to the DataGrid control. The following example illustrates:
<!-- A minimal DataGrid with some
style elements. Note that the default value of AutoGenerateColumns is true and
hence, this grid will display all columns in the associated data source
-->
<%@ Page language="c#" Codebehind="DataGrid_Sorting.aspx.cs" AutoEventWireup="false" Inherits="DataPresentation.DataGrid_Sorting" %>
<HTML>
...
<body MS_POSITIONING="GridLayout">
<form id="DataGrid_Sorting" method="post" runat="server">
<asp:DataGrid id="DataGrid1" runat="server" Width="667px" Height="126px"
BorderColor="#CC9966"
BorderStyle="None"
BorderWidth="1px" BackColor="White" CellPadding="4"
AllowSorting="True">
<SelectedItemStyle Font-Bold="True" ForeColor="#663399" BackColor="#FFCC66"></SelectedItemStyle>
<ItemStyle ForeColor="#330099" BackColor="White"></ItemStyle>
<HeaderStyle Font-Bold="True" ForeColor="#FFFFCC" BackColor="#990000"></HeaderStyle>
<FooterStyle ForeColor="#330099" BackColor="#FFFFCC"></FooterStyle>
<PagerStyle HorizontalAlign="Center" ForeColor="#330099" BackColor="#FFFFCC"></PagerStyle>
</asp:DataGrid>
</form>
...
</HTML>
/* Code behind for the data grid
above */
using System;
using System.Data;
using System.Data.OleDb;
...
public class DataGrid_Sorting : System.Web.UI.Page
{
/* Data members */
protected System.Web.UI.WebControls.DataGrid DataGrid1;
protected DataView dvData;
private void Page_Load(object sender, System.EventArgs e)
{
PopulateDataReader();
}
#region Web Form Designer generated code
override protected void OnInit(EventArgs e)
{
InitializeComponent();
base.OnInit(e);
}
private void InitializeComponent()
{
this.DataGrid1.SortCommand += new System.Web.UI.WebControls.DataGridSortCommandEventHandler(this.DataGrid1_SortCommand);
this.Load += new
System.EventHandler(this.Page_Load);
}
#endregion
/* Helper functions */
private void PopulateDataReader()
{
// Open a
connection
...
// Exeucte a simple query
to populate a data set
OleDbCommand cmd = new OleDbCommand();
cmd.Connection = conn;
cmd.CommandText = "select * from Products";
OleDbDataAdapter da = new OleDbDataAdapter( cmd );
DataSet ds = new DataSet();
da.Fill( ds );
// Now create a
data view based on the first (and only table) in the DataSet
dvData = new DataView( ds.Tables[0] );
// Now bind the
data grid to the table maintained by the data view
DataGrid1.DataSource = dvData;
DataGrid1.DataBind();
// Clean up
conn.Close();
}
/* SortCommand handler (AllowSoring is true)*/
private void DataGrid1_SortCommand(object source, System.Web.UI.WebControls.DataGridSortCommandEventArgs e)
{
// No need to
re-issue the query. Just sort data in the data view
dvData.Sort = e.SortExpression;
// Then rebind sorted data to the grid
DataGrid1.DataSource = dvData;
DataGrid1.DataBind();
}
}
In the code above, sorting is handled efficiently by using a DataView object to provide a view on the associated table. Whenever the user clicks a column header to sort it, the server-side handler is called, and instead of re-issuing the query with the selected sort order, I simply re-sort the DataView with the provided sort expression and then rebind the sorted data to the DataGrid. Note that the database is not hit every time a new sort order is required (the downside is that if there were new data, it will not show up.)
Note: the above code will cause all columns to be sort-able, i.e., the user can click on any column header to sort by that column. What if you wanted to limit the columns that can be sorted? In this case, the second DataGrid tag comes to the help. For each column you want to display, add an <asp:BoundColumn> tag, and for each displayed column that you want to be sortable, add a SortExpression attribute specifying the actual column name in the data source. For example:
...
<asp:DataGrid ... >
<Columns>
<asp:BoundColumn SortExpression="ProductID"
... />
...
<\Columns>
<\asp:DataGrid>
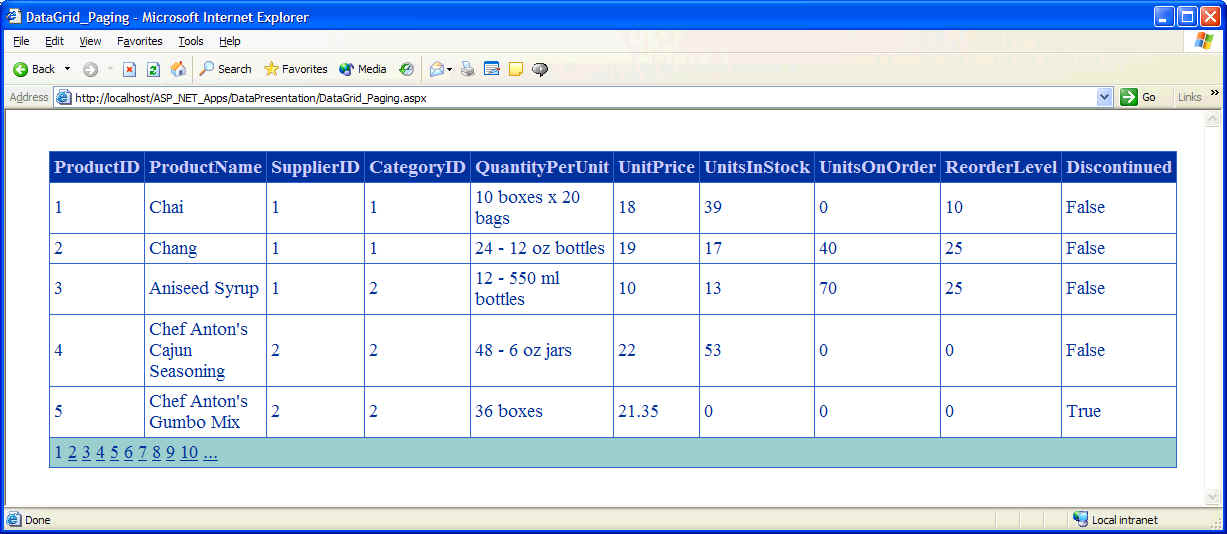
Suppose you wanted to display the contents of a table that had thousands of rows. A user-friendly approach would be to display multiple pages of the data table instead of displaying thousands of rows in the same page. The same exact approach that you would see when searching on Google where you click a number-link at the bottom of the page to go to that page.
Luckily, the DataGrid control supports paging by allowing you to retrieve a set of records from a table and then logically dividing these rows into multiple pages. The Data Grid control has paging functionality that allows the user to jump to a specific page. However, not the following restrictions:
Paging, by default, is turned off. To use it, enable paging by setting AllowPaging property to true and provide a handler for the PageIndexChanged event. The typical logic for the PageIndexChanged event is to set the CurrentPageIndex property to the index of the page that the user wants to display, and then use DataBind to rebind data to the DataGrid control. To determine the index of the page that the user want to display, use the NewPageIndex property of the DataGridPageChangedEventArgs event handler parameter. You can determine the number of items (rows) on a page by setting the PageSize property (default is 10 items)
<%@ Page language="c#" Codebehind="DataGrid_Paging.aspx.cs" AutoEventWireup="false" Inherits="DataPresentation.DataGrid_Paging" %>
<body MS_POSITIONING="GridLayout">
<form id="DataGrid_Paging" method="post" runat="server">
<asp:DataGrid id="DataGrid1" runat="server"
BorderColor="#3366CC" BorderStyle="None"
BorderWidth="1px" BackColor="White" CellPadding="4"
AllowPaging="True" PageSize="5">
<SelectedItemStyle ... ></SelectedItemStyle>
<ItemStyle ... ></ItemStyle>
<HeaderStyle ... ></HeaderStyle>
<FooterStyle ... ></FooterStyle>
<PagerStyle HorizontalAlign="Left" ForeColor="#003399" BackColor="#99CCCC" Mode="NumericPages"></PagerStyle>
</asp:DataGrid>
</form>
</body>
...
public class DataGrid_Paging : System.Web.UI.Page
{
protected System.Web.UI.WebControls.DataGrid DataGrid1;
protected DataView dvData;
private void Page_Load(object sender, System.EventArgs e)
{
PopulateDataReader();
}
private void PopulateDataReader()
{
// Open a connection
// Exeucte a simple query
// Sort the data reader
dvData = new DataView( ds.Tables[0] );
// Bind sorted results to the data grid
DataGrid1.DataSource = dvData;
DataGrid1.DataBind();
// Clean up
...
}
/* The PageIndexChanged event
handler */
private void DataGrid1_PageIndexChanged(object source, System.Web.UI.WebControls.DataGridPageChangedEventArgs e)
{
// Get index of the selected page then go to the selected page
DataGrid1.CurrentPageIndex = e.NewPageIndex;
// Then rebind sorted data to the grid
DataGrid1.DataBind();
}
}