
To handle an event using XAML, simply add the event's name as an attribute to the element whose events you want to handle. Set the value of the event attribute to the name of the event handler. For example, to handle the Click event on a Button:
<Button Click="btnClear_Handler">Clear</Button>
btnClear_Handler is a method that implements the handler for the Click event. This handler must have the same signature as the delegate declared by the Click event, RoutedEventHandler, in this case. For example:
// Place this code in the related "code-behind" file
void btnClear_Handler(object sender, RoutedEventArgs args)
{
...
}
The above can also be done in code as follows:
void MakeButton()
{
// Adding a routed event handler via
AddHanlder helper
Button b2 = new Button();
b2.AddHandler(Button.ClickEvent, new RoutedEventHandler(Onb2Click));
// Adding a routed event handler via C#
language syntax
Button b3 = new Button();
b3.Click += new RoutedEventHandler(Onb3Click);
}
void Onb2Click(object
sender, RoutedEventArgs e)
{
//logic to handle the Click event
}
void Onb3Click(object
sender, RoutedEventArgs e)
{
//logic to handle the Click event
}
In the previous example, the button handles an event that occurs directly on itself. However, in a typical WPF application, UI elements typically contain other elements as child elements, and the element raising the event might not be the element that handles the event as in the Button example. For example, in WPF, a parent element can produce many events that can be handled by the element's children. Conversely, child elements can produce many events that can be handled by the child elements' parent.
An illustrating scenario where routed events are useful is if you group a series of controls together such that the controls share a parent element, for example, a collection of Button objects with a StackPanel as shown below. The parent element is a common listener for the routed event. By using routed events, you can take advantage of the fact that one of the buttons will raise a bubbling routed event, and can place a common event handler on the parent of all three buttons:
<Border Height="30" Width="200" BorderBrush="Gray"
BorderThickness="1">
<!-- StackPanel handles all Click
events for its child button -->
<StackPanel Background="LightGray"
Orientation="Horizontal" Button.Click="CommonClickHandler">
<Button Name="YesButton"
Margin="3" Width="60">Yes</Button>
<Button Name="NoButton"
Margin="3" Width="60">No</Button>
<Button Name="CancelButton"
Margin="3" Width="60">Cancel</Button>
</StackPanel>
</Border>
private void
CommonClickHandler(object sender, RoutedEventArgs e)
{
FrameworkElement
feSource = e.Source as FrameworkElement;
switch (feSource.Name)
{
case "YesButton":
// do something here
...
break;
case "NoButton":
// do something ...
break;
case "CancelButton":
// do something ...
break;
}
// marking an event as
handled by setting Handled to true will "stop" routing for either
// a tunneling route, or
a bubbling route
e.Handled=true;
}
Potentially, the event could bubble to Border, and then beyond to the Window root of the element tree (not shown). In other words, the event route for this Click event is: Button → StackPanel → Border → ...
Event routing is therefore, the process of informing multiple elements that exist in a parent-child relationship about a particular event, until one of the elements handles the event and marks the event as Handled. Functionally, a routed event is an event that can invoke handlers that exist on various listeners in an element tree. Implementation-wise, a routed event is an event that is backed by the RoutedEvent class and the WPF event system. A typical WPF application contains many elements, and whether these elements were created in code or by loading XAML, these elements exist in an element-tree relationship to each other. The routed event model enables you to use the element tree and perpetuate an event along a route after it is raised. The route can travel in one of two directions, up or down the element tree. The event can invoke handlers on listeners at the element tree root, and then route to successive child elements along the tree node route towards the node element that is the event source. Or, the event can invoke listeners on the source element, and then route to successive parent elements until reaching the element tree root.
The example above illustrated bubbling routing events; a button may be the source of an event, but the event handler can be some other ascendant parent.
Events use one of three routing mechanisms: direct, bubbling, and tunnelling:
Direct: Only the element that fired the event is notified. This is analogous to the "routing" that Windows Forms used for events.
Bubbling: Event handlers on the event source are invoked. The event then routes to successive parent elements until reaching the element tree root. In other words, an event travels up the element tree by first notifying the target element, then the target's parent element, then the parent's parent, and so on.
Tunneling: Initially, event handlers at the element tree root are invoked. The event then travels a route through successive child elements along the tree node route, towards the node element that is the event source (the element that raised the event). Tunnelling is the same as Bubbling event routing except that the event travels in the opposite direction (starts at the root element and travels down the tree ending with the target element). Tunneling events are also sometimes referred to as Preview events, because of a naming convention that is used for the pairs.
All routed events share a common event data base class, RoutedEventArgs. RoutedEventArgs defines the Handled property, which takes a Boolean value. The purpose of the Handled property is to enable any event handler along the route to mark the routed event as handled, by setting the value of Handled to true. After being processed by the handler at one element along the route, the shared event data is again reported to each listener along the route.
The value of Handled affects how a routed event is reported or processed as it travels further along the route:
Note that there is a HandledEventsToo mechanism whereby listeners can still run handlers in response to routed events where Handled is true in the event data. In other words, the event route is not truly stopped by marking the event data as handled. You can only use the HandledEventsToo mechanism in code via AddHander, or in an EventSetter.
In WPF, events from input devices such as keyboard and mouse often come in pairs, with one being the bubbling event and one being the tunnelling event. Tunnelling events are prefixed by the word 'Preview' by convention. For example, the KeyDown event and the PreviewKeyDown event have the same signature, with the former being the bubbling input event and the latter being the tunnelling input event.
Consider the following figure where leaf element #2 is the source of both a PreviewMouseDown and then a MouseDown event:
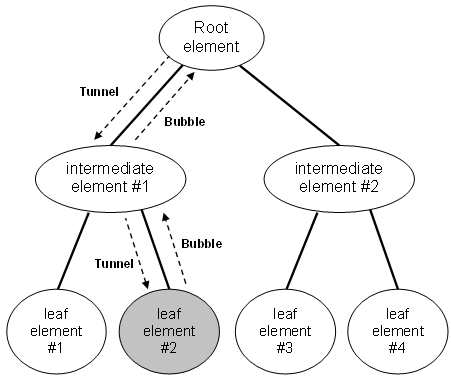
The order of event processing is as follows:
PreviewMouseDown (tunnel) on intermediate element #1.
PreviewMouseDown (tunnel) on source element #2.
MouseDown (bubble) on intermediate element #1.
MouseDown (bubble) on root element.
As shown, the tunnelling event is raised and travels its route. Then the bubbling event is raised and travels its route. The two events will literally share the same event data instance. Listeners with handlers for the tunnelling event have first opportunity to mark the event handled. If an element along the tunnelling route marked the event as handled, the already-handled event data is sent for the bubbling event, and typical handlers attached for the equivalent bubbling events will not be invoked.
A routed event handler delegate provides references to two objects: the object that raised the event (Source), and the object where the handler was invoked (Sender). Usually, once the input event is marked Handled, further handlers are not invoked. Typically, you should mark input events as handled as soon as a handler is invoked that addresses your application-specific logical handling of the event. The exception to this general statement about Handled state is that input event handlers that are registered to deliberately ignore Handled state of the event data would still be invoked along either route (via the HandledEventsToo mechanism.)
You do not always need to know or care that the event you are handling is implemented as a routed event. Routed events have special behavior, but that behavior is largely invisible if you are handling an event on the element where it is raised. So why are routed events required and why is a typical CLR event not adequate?
Where routed events become powerful is if you use any of the following scenarios:
Control composition and encapsulation: Various controls in WPF have a rich content model. For example, you can place an Image inside of a Button, which effectively extends the visual tree of the button. However, the added image must not break the hit-testing behavior that causes a button to respond to a Click of its content, even if the user clicks on pixels that are technically part of the image.
Singular handler attachment points: In Windows Forms, you would have to attach the same handler multiple times to process events that could be raised from multiple elements. Routed events enable you to attach that handler only once, as was shown in the previous example, and use handler logic to determine where the event came from if necessary.
Class handling: Routed events permit a static handler that is defined by the class. This class handler has the opportunity to handle an event before any attached instance handlers can.
Referencing an event without reflection: Certain code and markup techniques require a way to identify a specific event. A routed event creates a RoutedEvent field as an identifier, which provides a robust event identification technique that does not require static or run-time reflection.
Routed event listeners and routed event sources do not need to share a common event in their hierarchy. Any UIElement or ContentElement can be an event listener for any routed event. Therefore, you can use the full set of routed events available throughout the working API set as a conceptual "interface" whereby disparate elements in the application can exchange event information. Routed events can also be used to communicate through the element tree, because the event data for the event is perpetuated to each element in the route. One element could change something in the event data, and that change would be available to the next element in the route.
An attached event allows you to attach an event handler to some child element rather than to the parent that actually defines the event, even though neither the object raising the event nor the destination handling instance define or otherwise "own" that event in their namespace. In other words, an attached event enables you to add a handler for a particular event to an arbitrary element. Note that attached events typically use the OwningTypeName.EventName XAML syntax as shown in this example (shown earlier):
<Border Height="30" Width="200" BorderBrush="Gray"
BorderThickness="1">
<!-- StackPanel handles all Click
events for its child button. Note that use
of TypeName.EventName syntax is specifying the attached event
and its handler -->
<StackPanel Background="LightGray"
Orientation="Horizontal" Button.Click="CommonClickHandler">
<Button Name="YesButton"
Margin="3" Width="60">Yes</Button>
<Button Name="NoButton"
Margin="3" Width="60">No</Button>
<Button Name="CancelButton"
Margin="3" Width="60">Cancel</Button>
</StackPanel>
</Border>
Here, the parent element listener where the handler is added is a StackPanel. However, it is adding a handler for a routed event that was declared and will be raised by the Button class. Button "owns" the event, but the routed event system permits handlers for any routed event to be attached to any UIElement or ContentElement instance listener that could otherwise attach listeners for a common language runtime (CLR) event.
The process for handling an attached event, and the handler code
that you will write, is basically the same as for a routed event. In general, a
WPF attached event is not very different from a WPF routed event. The
differences are how the event is sourced and how it is exposed by a class as a
member (which also affects the XAML handler syntax).
Although WPF defines a number of attached events, the scenarios where you
will either use or handle the attached event directly are very limited.
Generally, the attached event serves an architecture purpose, but is then
forwarded to a non-attached (backed with a CLR event "wrapper") routed event.
You can create a routed event (direct, tunnelling, bubbling) by registering a RoutedEvent using the RegisterRoutedEvent method. This gives you the flexibility of creating a custom delegate and appropriate event argument classes.
WPF objects have a set of common stages of object lifetime. WPF programming exposes these stages as a series of events. There are four main types of objects in WPF with respect to lifetime events; elements in general, window elements, navigation hosts, and application objects. Any WPF framework-level element (FrameworkElement- or FrameworkContentElement- derived) has three common lifetime events in order of occurrence: Initialized, Loaded, and Unloaded.
Initialized is raised first, and roughly corresponds to the initialization of the object by the call to its constructor. Because the event happens in response to initialization, you are guaranteed that all properties of the object are set. A consequence of the requirement that all properties are set, is that a parent element cannot report initialization until the child elements that fill the property are also completely initialized. When you are writing handlers in response to the Initialized event, you must consider that there is no guarantee that all other elements in the element tree (either logical tree or visual tree) around where the handler is attached have been created, particularly parent elements.
Loaded is raised after Initialized. This event is raised before the final rendering, but after the layout system has calculated all necessary values for rendering. Standard data binding will have occurred prior to Loaded. Loaded entails that the logical tree that an element is contained within is complete, and connects to a presentation source that provides the HWND and the rendering surface. Standard data binding (binding to local sources, such as other properties or directly defined data sources) will have occurred prior to Loaded.
When Unloaded is raised and handled, the element that is the event source parent (as determined by Parent property) or any given element upwards in the logical or visual trees may have already been unset, meaning that data binding, resource references, and styles may not be set to their normal or last known run-time value.
Recall that routed events travel through a tree of elements in an application. Class handling is associated with routed events and refers to a function that has the opportunity to handle a particular event at a class level that is invoked before any instance handler. You can use a class handler to alter event data before instance handlers receive the event and its data.
Also recall that preview (aka tunnelling) events are raised before the equivalent bubbling event. And if the preview/tunnelling event is market as handled by an event handler, then the bubbling event will be marked as handled even before any listeners of the bubbling event receive it. Tunnelling and bubbling events are technically separate events, but they deliberately share the same instance of event data. An event is marked as handled by setting the Handled property on the event data.
When you set the value of the Handled property to true in the event data for a routed event, this is referred to as "marking the event handled". You should generally mark a routed event handled if your code responded to the routed event in a significant and relatively complete way.
Routed events consider two different types of listeners to the event: class listeners and instance listeners. Class listeners exist because types may have called RegisterClassHandler in their static constructor, or have overridden a class handler virtual method from an element base class. Instance listeners are particular class instances/elements where one or more handlers has been attached for that routed event by a call to AddHandler (corresponds to += syntax in C# or the < ... Click="MyClickHandler" ...> syntax in XAML).
Class listeners have the opportunity to respond to an event before any instance listener can. For this reason, class handlers are sometimes used to suppress events that a particular class implementation does not wish to propagate, or to provide special handling. Some elements, particularly the base elements such as UIElement, expose empty virtual methods that correspond to their list of public routed events. These virtual methods can be overridden to implement a class handler for that event. For instance, you can add class handling for the DragEnter event in any UIElement-derived class, by overriding the OnDragEnter virtual method. You could then choose to handle the event, raise other events, and so on. You should generally call the base implementation in such overrides even if you mark the event handled. Calling the base implementation is prudent because it is possible that other classes in the hierarchy also had class handling that should be preserved.
Recall that preview events (aka, Tunnelling events) are routed events where the direction of the route travels from the application root towards the element that raised the event. Also recall that handling a preview event on any element other than the element that raised it has the effect of not allowing an element to handle its own events. For input events especially, preview events share event-argument instances with the equivalent bubbling event. This implies the following:
If you use a preview event class handler to mark the event handled, the bubbling input event class-handler will not be invoked.
If you use a preview event instance handler to mark the event handled, a general-purpose event-handler for the bubbling event will not be invoked.
Typically there is really only one element that needs to respond to an event. But the HandledEventsToo overload is available for the exceptional cases where some other element in an element tree or control compositing has already marked an event as handled, but other elements either higher or lower in the element tree (depending on route) still wish to have their own handlers invoked.
Generally, events marked handled should not be marked unhandled (Handled set back to false) even by handlers that act on HandledEventsToo. However, some input events have high-level and lower-level events that can overlap. For instance, if a child element listens to a high-level key event such as TextInput while a parent element listens to a low-level event such as KeyDown, if the parent element handles the low-level event, that can suppress the higher level event even in the child element that intuitively should have first opportunity to handle the event.
In these situations it may be necessary to add handlers to both parent elements and child elements for the low-level event. The child element handler implementation can mark the low-level event as handled, but the parent element handler implementation would set it unhandled again so that further elements up the tree (as well as the high-level event) can have the opportunity to respond.The main scenario where class handling of events is used is for input events and composite controls. A composited control is by definition composed of multiple practical controls. Often the author of the control wishes to amalgamate all of the possible input events that each of the subcomponents might raise, in order to report the entire control as the singular event source. In some cases the control author might wish to suppress the events from components entirely, or substitute a component-defined event that carries more information or implies a more specific behavior.
A property change events is an event that occurs when the value of an element property changes. Certain events use an event data type and delegate that are explicitly used for property change events. The event data type is RoutedPropertyChangedEventArgs<T>, and the delegate is RoutedPropertyChangedEventHandler<T>. The event data and delegate both have a generic type parameter that is used to specify the actual type of the changing property when you define the handler. The event data contains two properties, OldValue and NewValue, which are both then passed as the type argument in the event data. The "Routed" part of the name indicates that the property changed event is registered as a routed event. The advantage of routing a property changed event is that the top level of a control can receive property changed events if properties on the child elements (the control's composite parts) change values. Generally, the values are provided so that you can act on those values in other logic areas of your code.
For instance, the property IsMouseCaptured has a property changed event IsMouseCapturedChanged. The property itself is read-only, with its value adjusted by the input system, and the input system raises IsMouseCapturedChanged on each real-time change. Further examples of events that use type-constrained delegates based on RoutedPropertyChangedEventHandler<T> include TreeView.SelectedItemChanged and RangeBase.ValueChanged.
The following examples defines and attaches a handler for the event:
// Assume we have a TreeView element named tv. The
following defines
// and attaches a handler for the SelectedItemChanged event
tv.SelectedItemChanged += new RoutedPropertyChangedEventHandler<object>(tv_SelectedItemChanged);
void tv_SelectedItemChanged(object sender, RoutedPropertyChangedEventArgs<object>
e)
{
object oNewValue = e.NewValue;
object oOldValue = e.OldValue;
}
WPF introduces a particular design pattern for the specific case when handlers that are attached to event sources are not destroyed in coordination with the listener object that attached the handler to the source. This design pattern is known as the WeakEvent pattern. WPF provides a dedicated manager class for weak events and implements an interface on listeners for that event.
Listening to events can lead to memory leaks. Consider this typical scenario to add an event handler:
Button btn = new Button();
btn.Click += new RoutedEventHandler(SomeObject.OnBtnClick);
This technique creates a strong reference from the event source
btn to the event listener
SomeObject. Ordinarily, attaching an event handler for a listener (i.e.,
SomeObject) causes the listener to have an object
lifetime that influenced by the object lifetime for the source object (i.e.,
btn), unless the event handler is explicitly
removed. But in certain circumstances you might want the object lifetime of the
listener (i.e., SomeObject) to be controlled only by
other factors, such as whether it currently belongs to the visual tree of the
application, and not by the lifetime of the source object. Whenever the source
object lifetime extends beyond the object lifetime of the listener object, the
normal event pattern leads to a memory leak: the listener is kept alive longer
than intended.
The WeakEvent pattern is designed to solve this memory leak problem. The
WeakEvent pattern can be used whenever a listener object needs to register for
an event but the listener object does not explicitly know when to unregister,
and whenever the object lifetime of the source exceeds the "useful" object
lifetime of the listener object. The WeakEvent pattern allows the listener to
register for and receive the event without affecting the object lifetime
characteristics of the listener in any way.
Implementing the WeakEvent pattern will is primarily for control
authors. This is because as a control author you are largely responsible for the
behavior and containment of your control and the impact it has on applications
in which it is inserted. This includes the control object lifetime behavior, in
particular the handling of the memory leak problem described.
Certain scenarios inherently lend themselves to application of the WeakEvent
pattern. One such scenario is data binding, where it is often the case that a
source object that is a data source is completely independent of a listener
object, which is a target of a binding.
There are three steps to Implementing the WeakEvent pattern:
Derive a manager from the WeakEventManager
class.
Typically, you will create manager classes at a 1:1 relationship to
events that implement the pattern. For instance, if you have an event
Spin, you would derive a
SpinEventManager class as the dedicated weak event manager for the
event.
Implement the IWeakEventListener
interface on any class that wants to register listeners for the weak event.
Implementing IWeakEventListener class requires
implementing the interface method ReceiveWeakEvent.
The ReceiveWeakEvent implementation must be a
centralized implementation that directs any event reference that exists on
that class to the appropriate WeakEventManager.
When adding listeners, only use the AddListener and RemoveListener implementations in the dedicated WeakEventManager for that event.
The following example retrieves and displays basic event information for a Button Click event handler:
<StaticPanel Name="MainWrapPanel"
Background="Azure" Orientation="Horizontal">
<Button Name="MyButton"
Content="Click Me" Click="btn_Handler" />
</StaticPanel>
public partial class BasicEvent :
System.Windows.Controls.Page
{
private int nCount = 0;
public BasicEvent()
{
InitializeComponent();
}
// Recall that Routed Event refers to
the concept of an event moving in a tree
// of elements. There are three types of event routing:
direct, bubbling, and
// tunnelling. With direct routing, the event does not move
in the tree. With
// bubbling, the event moves up to the top of the tree. With
tunnelling, the event
// starts at the top of the tree and moves down to the source
of the event*/
private void btn_Handler(object sender,
RoutedEventArgs args)
{
DisplayEventData(sender, args);
MessageBox.Show("Click event
received");
}
// Output from this function is shown
below
private void DisplayEventData(object sender, RoutedEventArgs
args)
{
// The sender
parameter passed to a handler is always the element to which
// the handler was attached.
StringBuilder sb = new
StringBuilder();
FrameworkElement feSender = (FrameworkElement)sender;
// The presence
of both Source and OriginalSource enable you to work with the
// higher-level logical tree or the
lower-level visual tree. This distinction
// only applies to physical events
like mouse events, however. For more abstract
// events that don't necessarily have
a direct relationship with an element in
// the visual tree (like Click due to
its keyboard support), the same object is
// passed for both Source and
OriginalSource.
FrameworkElement feSource = (FrameworkElement)args.Source;
FrameworkElement feSourceVisual = (FrameworkElement)args.OriginalSource;
// Construct
outpu string
sb.Append("Event Sender " +
feSender.Name + Environment.NewLine);
sb.Append("Event fired by logical
tree element " + feSource.Name + Environment.NewLine);
sb.Append("Event fired by visual tree
element " + feSourceVisual.Name + Environment.NewLine);
sb.Append("Event routing strategy is
" + args.RoutedEvent.RoutingStrategy.ToString() + Environment.NewLine);
Trace.WriteLine(sb.ToString());
}
}
Output from DisplayEventData function:
Event Sender MyButton
Event fired by logical tree element MyButton
Event fired by visual tree element MyButton
Event routing strategy is Bubble
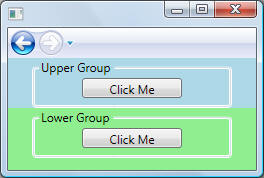
The following example illustrates a bubbling events. A Button is placed inside a GroupBox which is inside a StackPanel. This visual structure is used to illustrate the concept of bubbling events. Each ancestor is allowed to handle the Button.Click event that is sourced by the clicked Button.
<-- Note the syntax for handling the Click event
in each ancestors -->
<Page x:Class="Events.RoutedEventHandling"
xmlns="http://schemas.microsoft.com/winfx/2006/xaml/presentation"
xmlns:x="http://schemas.microsoft.com/winfx/2006/xaml"
Title="RoutedEventHandling">
<DockPanel LastChildFill="True">
<StackPanel DockPanel.Dock="Top"
Name="StackPanelUpper" Background="LightBlue" Button.Click="StackPanelUpper_Handler">
<GroupBox
Name="GroupBoxUpper" Button.Click="GroupBoxUpper_Handler"
Header="Upper Group" Height="50" Width="200" HorizontalAlignment="Center">
<Button Name="ButtonUpper" Content="Click Me" Button.Click="ButtonUpper_Handler"
Height="20" Width="100"/>
</GroupBox>
</StackPanel>
<StackPanel Name="StackPanelLower"
Background="LightGreen" Button.Click="StackPanelLower_Handler">
<GroupBox
Name="GroupBoxLower" Button.Click="GroupBoxLower_Handler" Header="Lower Group"
Height="50" Width="200" HorizontalAlignment="Center">
<Button Name="ButtonLower" Content="Click Me" Button.Click="ButtonLower_Handler"
Height="20" Width="100"/>
</GroupBox>
</StackPanel>
</DockPanel>
</Page>
public partial class RoutedEventHandling :
System.Windows.Controls.Page
{
public RoutedEventHandling()
{
InitializeComponent();
}
/* Handling events for upper controls
*/
private void StackPanelUpper_Handler(object sender,
RoutedEventArgs args)
{
DisplayEventData(sender, args);
}
private void GroupBoxUpper_Handler(object sender,
RoutedEventArgs args)
{
// Handle the event.
StackPanelUpper_Handler handler will not be invoked
args.Handled = true;
DisplayEventData(sender, args);
}
private void ButtonUpper_Handler(object sender,
RoutedEventArgs args)
{
DisplayEventData(sender, args);
}
/* Handling events for lower controls
*/
private void StackPanelLower_Handler(object sender,
RoutedEventArgs args)
{
DisplayEventData(sender, args);
}
private void GroupBoxLower_Handler(object sender,
RoutedEventArgs args)
{
DisplayEventData(sender, args);
}
private void ButtonLower_Handler(object sender,
RoutedEventArgs args)
{
DisplayEventData(sender, args);
}
// Helper
private void DisplayEventData(object sender, RoutedEventArgs
args)
{
FrameworkElement feSender = (FrameworkElement)sender;
FrameworkElement feSource = (FrameworkElement)args.Source;
FrameworkElement feOriginalSource = (FrameworkElement)args.OriginalSource;
// Create and
display information
StringBuilder sb = new
StringBuilder();
sb.AppendLine("Event sender: " +
feSender.Name);
sb.AppendLine("Event source: " +
feSource.Name);
sb.AppendLine("Event Original Source:
" + feOriginalSource.Name);
sb.AppendLine("Event source routing
strategy: " + args.RoutedEvent.RoutingStrategy.ToString());
sb.AppendLine("Event Handled: " +
args.Handled);
sb.AppendLine("");
Trace.WriteLine(sb.ToString());
}
}
Output from clicking upper Button. Because GroupBoxUpper handles the event (Handled = true), the event does not bubble to the StackPanelUpper:
Event sender: ButtonUpper
Event source: ButtonUpper
Event Original Source: ButtonUpper
Event source routing strategy: Bubble
Event Handled: False
Event sender: GroupBoxUpper
Event source: ButtonUpper
Event Original Source: ButtonUpper
Event source routing strategy: Bubble
Event Handled: True
Output from clicking lower button. Note that the event bubbles from ButtonLower to GroupBoxLower to StackPanelLower:
Event sender: ButtonLower
Event source: ButtonLower
Event Original Source: ButtonLower
Event source routing strategy: Bubble
Event Handled: False
Event sender: GroupBoxLower
Event source: ButtonLower
Event Original Source: ButtonLower
Event source routing strategy: Bubble
Event Handled: False
Event sender: StackPanelLower
Event source: ButtonLower
Event Original Source: ButtonLower
Event source routing strategy: Bubble
Event Handled: False
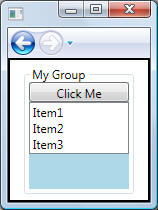
Because of the rich information passed to routed events, you could handle every event that tunnels or bubbles with one top-level megahandler as shown below by examining the RoutedEvent property to determine which event got raised. This is made possible by the delegate contra-variance feature which enables a delegate to be used with a method whose signature uses a base class of an expected parameter (e.g. RoutedEventArgs instead of SelectionChangedEventArgs). In the code below, GenericHandler method simply casts the RoutedEventArgs parameter when necessary to get the extra information specific to the event.
<Page x:Class="Events.RoutedEventMegaHandling"
xmlns="http://schemas.microsoft.com/winfx/2006/xaml/presentation"
xmlns:x="http://schemas.microsoft.com/winfx/2006/xaml"
Title="Events" Button.Click="GenericHandler" ListBox.SelectionChanged="GenericHandler">
<Border BorderBrush="Black" BorderThickness="2" >
<GroupBox Name="gb" Header="My Group" HorizontalAlignment="Center" Margin="5">
<StackPanel DockPanel.Dock="Top" Name="sp" Background="LightBlue">
<Button Name="btn" Content="Click Me" Height="20" Width="100"/>
<ListBox Name="lst">
<ListBoxItem Content="Item1" />
<ListBoxItem Content="Item2" />
<ListBoxItem Content="Item3" />
</ListBox>
</StackPanel>
</GroupBox>
</Border>
</Page>
public partial class RoutedEventMegaHandling : System.Windows.Controls.Page
{
public RoutedEventMegaHandling()
{
InitializeComponent();
}
private void GenericHandler(object sender, RoutedEventArgs args)
{
if (args.RoutedEvent == Button.ClickEvent)
{
MessageBox.Show("You just clicked " + args.Source);
}
else if (args.RoutedEvent == ListBox.SelectionChangedEvent)
{
SelectionChangedEventArgs sce = (SelectionChangedEventArgs)args;
if (sce.AddedItems.Count > 0)
MessageBox.Show("You just selected" + sce.AddedItems[0]);
}
}
}
In the output screen, clicking the button or selecting a ListBoxItem invokes the GenericHandled method.
Recall that routed events can be handled either by class handlers or instance handlers (see previous examples) on any given node in the route. Class handlers are invoked first, and can be used by class implementations to suppress events from instance handling or introduce other event specific behaviors on events that are owned by base classes.
See EventManager.RegisterClassHandler for more details.
In styles or in templates, you can use EventSetter to include pre-declared XAML event handling syntax in the XAML markup. When the template or style is applied, the referenced handler is added to the templated instance. You can only declare an EventSetter for a routed event. The following is an example. Note that the b1SetColor method referenced here is again in a code-behind file.:
<StackPanel
xmlns="http://schemas.microsoft.com/winfx/2006/xaml/presentation"
xmlns:x="http://schemas.microsoft.com/winfx/2006/xaml"
x:Class="SDKSample.EventOvw2"
Name="dpanel2"
Initialized="PrimeHandledToo">
<StackPanel.Resources>
<Style TargetType="{x:Type Button}">
<EventSetter
Event="Click" Handler="b1SetColor"/>
</Style>
</StackPanel.Resources>
<Button>Click me</Button>
<Button Name="ThisButton" Click="HandleThis">Raise
event, handle it, use handled=true handler to get it anyways
</Button>
</StackPanel>