Input refers to input events which are related to key presses, mouse buttons, mouse wheel, mouse movement, focus management, and mouse capture, to name a few. Many input events have a pair of events associated with them. For example, the key down event is associated with the KeyDown and PreviewKeyDown events. The difference in these events is in how they are routed to the target element. Preview events tunneling down the element tree from the root element to the target element. Bubbling events bubbling up from the target element to the root element.
The primary input API exposure is found on the base element classes: UIElement, ContentElement, FrameworkElement, and FrameworkContentElement. In addition to the input API on the base element classes, the Keyboard class and Mouse classes provide additional API for working with keyboard and mouse input. For example,
// Uses the
Keyboard.GetKeyStates to determine if a key is down.
// A bitwise AND operation is used in the comparison.
// e is an instance of KeyEventArgs.
if ((Keyboard.GetKeyStates(Key.Return) & KeyStates.Down) > 0)
{
btnNone.Background = Brushes.Red;
}
if (Mouse.LeftButton ==
MouseButtonState.Pressed)
{
UpdateSampleResults("Left Button Pressed");
}
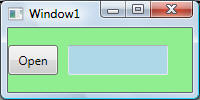
The TextInput event enables you to listen for text input in a device-independent manner. The keyboard is the primary means of text input, but speech, handwriting, and other input devices can generate text input also. For keyboard input, WPF first sends the appropriate KeyDown / KeyUp events. If those events are not handled and the key is textual (rather than a control key such as directional arrows or function keys), then a TextInput event is raised. Consider the following example and note that TextBox txt does not have a TextInput handler:
<Window x:Class="InputsAndCommands.TextInput"
xmlns="http://schemas.microsoft.com/winfx/2006/xaml/presentation"
xmlns:x="http://schemas.microsoft.com/winfx/2006/xaml"
Title="Window1" Height="100" Width="200">
<Grid>
<StackPanel Name="stkpnl" KeyDown="stkpnl_KeyDown"
Orientation="Horizontal" Background="LightGreen">
<Button
Name="btn" Content="Open" Click="btn_Click" Width="50" Height="30"
Margin="0,0,10,0"/>
<TextBox
Name="txt" Width="100" Height="30" Background="LightBlue"></TextBox>
</StackPanel>
</Grid>
</Window>
public partial class TextInput : Window
{
public TextInput()
{
InitializeComponent();
}
private void btn_Click(object sender, RoutedEventArgs e)
{
Trace.WriteLine("btn_Click");
e.Handled = true;
}
private void stkpnl_KeyDown(object sender, KeyEventArgs e)
{
Trace.WriteLine("stkpnl_KeyDown");
e.Handled = true;
}
}
Note the following behavior:
In this example, the KeyDown event is handled within a StackPanel that contains a TextBox. Because input events like KeyDown bubble up the event route, whenever you type inside the TextBox the StackPanel receives the input. The TextBox control is notified first but stkpnl_KeyDown handler is called because TextBox did not handle the input (i.e., did not have a TextInput handler). If the PreviewKeyDown event is used instead of the KeyDown event, the stkpnl_KeyDown handler is called first. And if the TextBox handled TextInput, stkpnl_KeyDown would not get called.
The following example shows how to detect when the Enter key is pressed within a TextBox:
<StackPanel>
<TextBlock Width="300" Height="20" Text="Type some text into
the TextBox and press the Enter key" />
<TextBox Width="300" Height="30" Name="textBox1" KeyDown="OnKeyDownHandler"/>
<TextBlock Width="300" Height="100" Name="textBlock1"/>
</StackPanel>
private void
OnKeyDownHandler(object sender, KeyEventArgs e)
{
if (e.Key == Key.Return)
{
textBlock1.Text = "You Entered: " +
textBox1.Text;
}
}
There are two main concepts that pertain to focus in WPF: keyboard focus and logical focus.
Keyboard focus refers to the element that is receiving keyboard input. There can be only one element on the whole desktop that has keyboard focus. In WPF, the element that has keyboard focus will have IsKeyboardFocused set to true. The static Keyboard.FocusedElement method returns the element that currently has keyboard focus. Keyboard focus can be obtained by tabbing to an element or by clicking the mouse on certain elements, such as a TextBox. Keyboard focus can also be obtained programmatically by using the Keyboard.Focus method:
Keyboard.Focus( btnOpenFile );
In order for an element to obtain keyboard focus the Focusable property and the IsVisible properties must be set to true.
A focus scope is a container element that keeps track
of the focused element within its scope. Logical focus refers to the
FocusManager.FocusedElement in a focus scope. There
can be multiple elements that have logical focus in an application, but there
may only be one element that has logical focus in a particular focus scope.
When focus leaves a focus scope, the focused element will lose keyboard focus
but will retain logical focus. When focus returns to the focus scope, the
focused element will obtain keyboard focus. This allows for keyboard focus to be
changed between multiple focus scopes but insures that the focused element
within the focus scope remains the focused element when focus returns. An
element can be turned into a focus scope in XAML by setting the
FocusManager.IsFocusScope attached property to
true, or in code by setting the attached property by
using the SetIsFocusScope method. Classes in WPF
which are focus scopes by default are Window,
Menu, ToolBar, and
ContextMenu.
The KeyboardNavigation class is responsible for implementing default keyboard focus navigation when one of the navigation keys is pressed. The navigation keys are:
TAB
SHIFT+TAB
CTRL+TAB
CTRL+SHIFT+TAB
UPARROW
DOWNARROW
LEFTARROW,
RIGHTARROW
The navigation behavior of a navigation container can be changed by setting the attached KeyboardNavigation properties TabNavigation, ControlTabNavigation, and DirectionalNavigation. These properties are of type KeyboardNavigationMode and the possible values are Continue, Local, Contained, Cycle, Once, and None. The default value is Continue, which means the element is not a navigation container.
The following example creates a Menu with a number of MenuItem objects. When focus is changed using the tab key within the Menu, focus will move from each element and when the last element is reached focus will return to the first element.
<Menu KeyboardNavigation.TabNavigation="Cycle">
<MenuItem Header="Menu Item 1" />
<MenuItem Header="Menu Item 2" />
<MenuItem Header="Menu Item 3" />
<MenuItem Header="Menu Item 4" />
</Menu>
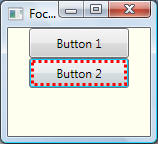
Focus visual style is a mechanism for changing the visual appearance of a control when it receives keyboard focus. Focus visual style creates a separate visual tree for an adorner that draws on top of the control, rather than changing the visual tree of the control. You define this separate visual tree using a style that fills the FocusVisualStyle property. The following example illustrates:
<Window x:Class="InputsAndCommands.FocusVisualStyleExample"
xmlns="http://schemas.microsoft.com/winfx/2006/xaml/presentation"
xmlns:x="http://schemas.microsoft.com/winfx/2006/xaml"
Title="FocusVisualStyleExample" Height="144" Width="158">
<Window.Resources>
<Style x:Key="MyFocusVisual">
<Setter
Property="Control.Template">
<Setter.Value>
<ControlTemplate>
<Rectangle Margin="2" StrokeThickness="3" Stroke="Red" StrokeDashArray="1 1"/>
</ControlTemplate>
</Setter.Value>
</Setter>
</Style>
</Window.Resources>
<StackPanel Background="Ivory" Orientation="Vertical">
<Button Name="btn1" Content="Button
1" Width="100" Height="30" FocusVisualStyle="{StaticResource MyFocusVisual}" />
<Button Name="btn2" Content="Button
2" Width="100" Height="30" FocusVisualStyle="{StaticResource MyFocusVisual}" />
</StackPanel>
</Window>

Copy, Cut, and Paste, and many others are commands which are found on many applications. These commands perform consistent actions across applications and classes, but the logic of the action is specific to the particular object acted upon. For example, the actual logic for performing the Cut operation is defined by the object or the application on which the cut is occurring (text, image, tablet, etc) and not on the source (button, menu item, etc. ) that invoked the command. A text object may cut the selected text into the clipboard, while an image object may cut the selected image, but the same command source, a MenuItem or a Button, can be used to invoke the command on both classes
The commanding system in WPF is based around the RoutedCommand and the RoutedEvent. What makes commands different from a simple event handler attached to a button or a timer is that commands separate the semantics and the originator of an action from its logic. This allows for multiple and disparate sources (MenuItem, Button, etc. ) to invoke the same command logic, and allows the command logic to be customized for different targets (text, image, table, row, etc. ).
The simplest way to use a command in WPF is to use a predefined RoutedCommand from one of the command library classes; use a control that has native support for handling the command; and use a control that has native support for invoking a command. For example, the Paste command is one of the predefined commands in the ApplicationCommands class. The TextBox control has built in logic for handling the Paste command. And the MenuItem class has native support for invoking commands.
The following example shows how to set up a MenuItem so that when it is clicked it will invoke the Paste command on a TextBox, assuming the TextBox has keyboard focus:
<Window x:Class="InputsAndCommands.BasicCommand1"
xmlns="http://schemas.microsoft.com/winfx/2006/xaml/presentation"
xmlns:x="http://schemas.microsoft.com/winfx/2006/xaml"
Title="BasicCommand1" Height="100" Width="300" >
<Border BorderBrush="DarkBlue" BorderThickness="2">
<StackPanel Orientation="Vertical"
VerticalAlignment="Center" >
<Menu
Width="100">
<MenuItem Command="ApplicationCommands.Paste" />
<MenuItem Command="ApplicationCommands.Copy" />
</Menu>
<TextBox
Name="txt" Width="200" />
</StackPanel>
</Border>
</Window>
Output screens are shown below:
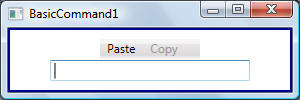
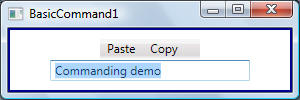
When TextBox is given focus, Paste menu item gets enabled automatically. When I type and highlight typed text in TextBox, Copy menu item gets enabled automatically. If I delete any text in TextBox and then click Paste menu item, the text previously copied via Copy menu item is pasted into the TextBox.
Commanding in WPF can be broken up into four main concepts: the command, the command source, the command target, and the command binding:
The command is the action to be executed (Paste in previous example).
The command target is the object that the command is being executed on (TextBox).
The command binding is the object which maps the command logic to the command (supplied by TextBox).
It is worth noting that it is not always the case that the CommandBinding is supplied by the control that is the command target class. Quite often the CommandBinding must be created by the application developer, or the CommandBinding might be attached to an ancestor of the command target.
Commands in WPF are created by implementing the ICommand interface. The WPF implementation of ICommand is the RoutedCommand class. ICommand exposes two methods, Execute, and CanExecute, and an event, CanExecuteChanged. Execute performs the actions that are associated with the command. CanExecute determines whether the command can execute on the current command target. CanExecuteChanged is raised if the command manager that centralizes the commanding operations detects a change in the command source that might invalidate a command that has been raised but not yet executed by the command binding.
The main sources of input in WPF are the mouse, the keyboard, ink, and routed commands. The Execute and CanExecute methods of a RoutedCommand do not contain the application logic for the command, but rather they raise routed events that tunnel and bubble through the element tree until they encounter an object with a CommandBinding. The CommandBinding contains the handlers for these events and it is the handlers that perform the command. The Execute method on a RoutedCommand raises the PreviewExecuted and the Executed events on the command target. The CanExecute method on a RoutedCommand raises the CanExecute and PreviewCanExecute events on the command target. These events tunnel and bubble through the element tree until they encounter an object which has a CommandBinding for that particular command.
WPF supplies a set of common routed commands spread across several classes: MediaCommands, ApplicationCommands, NavigationCommands, ComponentCommands, and EditingCommands. The commands in the ApplicationCommands class and commands in the other command library classes are intended to represent a set of common commands that application programmers encounter frequently. The commands only represent the instance of the RoutedCommand and not the implementation logic for the command.
A command source is the object which invokes the command. Examples of command sources are MenuItem, Button, and KeyGesture. The following example shows how to use MenuItem elements as command sources for the Paste and Copy commands:
<Menu
Width="100">
<MenuItem Command="ApplicationCommands.Paste" />
<MenuItem Command="ApplicationCommands.Copy" />
</Menu>
Command sources in WPF generally implement the ICommandSource interface. Typically, a command source will listen to the CanExecuteChanged event. This event informs the command source that the ability of the command to execute on the current command target may have changed. The command source can determine whether it can execute its command using RoutedCommand.CanExecute method. The command source can then disable itself if the command cannot execute. An example of this is a MenuItem graying itself out when a command cannot execute.
A CommandBinding binds/associates a command with the event handlers that implement the command. The CommandBinding class contains the following members:
Command property. Command is the command that the CommandBinding is being associated with.
PreviewExecuted and Executed. The event handlers which are attached to the PreviewExecuted and Executed events implement the command logic.
PreviewCanExecute andCanExecute events. The event handlers attached to the PreviewCanExecute and CanExecute events determine if the command can execute on the current command target.
The following example shows how to create a CommandBinding on the root Window of an application. The CommandBinding associates the Open command with Executed and CanExecute handlers.
<Window.CommandBindings>
<!-- Associate the Open command with
the specified handlers -->
<CommandBinding Command="ApplicationCommands.Open"
Executed="OpenCmdExecuted" CanExecute="OpenCmdCanExecute"/>
</Window.CommandBindings>
void OpenCmdExecuted(object target,
ExecutedRoutedEventArgs e)
{
string command = ((RoutedCommand)e.Command).Name;
string targetobj = ((FrameworkElement)target).Name;
MessageBox.Show("The " + command + " command has been invoked
on target object " + targetobj);
}
void OpenCmdCanExecute(object sender, CanExecuteRoutedEventArgs e)
{
e.CanExecute = true;
}
The object that the CommandBinding is attached to (Window in the previous example) defines the scope of the binding. For example, a CommandBinding attached to an ancestor (i.e., example above) of the command target (the object that the command is being executed on) can be reached by the Executed event, but a CommandBinding attached to a descendant of the command target cannot be reached. This is a direct consequence of the way a RoutedEvent tunnels and bubbles from the object that raises the event.
Recall that RoutedCommand class implements ICommand interface which exposes two methods, Execute, and CanExecute, and an event, CanExecuteChanged. The command target is the element on which the command is executed. With regards to a RoutedCommand, the command target is the element at which routing of the Executed and CanExecute starts.
The command source can explicitly set the command target as shown below:
<StackPanel>
<Menu>
<MenuItem Command="ApplicationCommands.Paste"
CommandTarget="{Binding ElementName=mainTextBox}" />
</Menu>
<TextBox Name="mainTextBox"/>
</StackPanel>
Generally, the above approach is not recommended. When the CommandTarget is not defined, the element with keyboard focus will be used as the command target. The benefit of this is that it allows the application developer to use the same command source (MenuItem above) to invoke a command (Paste above) on multiple command targets without having to keep track of the command target:
<StackPanel>
<Menu>
<!-- You can
usually omit the class name of the library class that exposes the
static command property -->
<MenuItem Command="Paste"
/>
</Menu>
<!-- Command source MenuItem will
invoke the Paste command on the element with the keyboard focus -->
<TextBox Name="UserName" Width="100"/>
<TextBox Name="Password" Width="100"/>
<TextBox Name="Address1" Width="100"/>
<TextBox Name="Address2" Width="100"/>
<TextBox Name="City" Width="100"/>
...
</StackPanel>
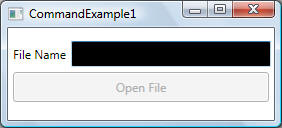
The following examples shows the basics of setting up and using WPF commanding. Button btnSource is the command source for the Open command. The Open command is handled by event handlers specified in a CommandBinding at the root level:
<Window x:Class="InputsAndCommands.CommandExample1"
xmlns="http://schemas.microsoft.com/winfx/2006/xaml/presentation"
xmlns:x="http://schemas.microsoft.com/winfx/2006/xaml"
Title="CommandExample1" Height="300" Width="300">
<Window.CommandBindings>
<!-- A command
binding to bind the Open command (whose sourse is the btnOpen button)
with the event handlers shown below
-->
<CommandBinding x:Name="cmdbndOpen"
Command="Open"
Executed="CommandBinding_Executed"
CanExecute="CommandBinding_CanExecute"/>
</Window.CommandBindings>
<StackPanel Orientation="Vertical" VerticalAlignment="Center">
<!-- Button is
a command source for the 'Open' command. The event handlers for the 'Open'
command issued by this button are
specified in 'cmdbndOpen'command binding element -->
<StackPanel
Orientation="Horizontal">
<Label
Content="File Name"></Label>
<TextBox
Name="txtFileName" Background="Black" Foreground="White" Width="200"/>
</StackPanel>
<Button Name="btnSource"
Command="Open"
Content="Open File" Height="30" Margin="5"/>
</StackPanel>
</Window>
public partial class CommandExample1 : Window
{
public CommandExample1()
{
InitializeComponent();
}
private void CommandBinding_Executed(object sender,
ExecutedRoutedEventArgs e)
{
// Open the
file
MessageBox.Show("Add logic here to open and read file
");
}
private void
CommandBinding_CanExecute(object sender, CanExecuteRoutedEventArgs e)
{
// Can execute
if txtFileName has some input
e.CanExecute = (txtFileName.Text
!= "");
return;
}
}
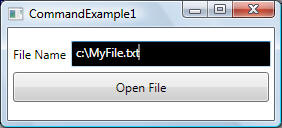
Output screens are shown below. Note how the Open button is disabled/enabled as per the logic in CommandBinding_CanExecute:
In the example above, the WPF-supplied Open command was used. It is very easy to use your own custom commands. In the code above, do the following to create and use your own command:
Instantiate a RoutedCommand object
public static RoutedCommand
CustomRoutedCommand = new
RoutedCommand
Change all Command attributes to reference this new command:
<Button Name="btnSource" Command="{x:Static
MyNameSpace:MyWindow.CustomRoutedCommand}"
... />
Re-implement the command event handlers (Execute and CanExecute handlers) to perform required logic for your custom command.