Animation is an illusion that is created by quickly cycling through a series of images, each slightly different from the last. For example, a program that makes a drawing of a rectangle fade out of view might work as follows:
The program creates a timer.
The program checks the timer at set intervals to see how much time has elapsed.
Each time the program checks the timer, it computes the current opacity value for the rectangle based on how much time has elapsed.
The program then updates the rectangle with the new value and redraws it.
WPF includes an efficient timing system that is exposed through managed code and(XAML and that is deeply integrated into the WPF framework. WPF animation makes it easy to animate controls and other graphical objects. WPF handles all the behind-the-scenes work of managing a timing system and redrawing the screen efficiently. It provides timing classes that enable you to focus on the effects you want to create, instead of the mechanics of achieving those effects.
If you understand a few important concepts about the timing system, WPF animations can be easier to use. In WPF, you animate objects by applying animation to their individual properties. For example, to make a framework element grow, you animate its Width and Height properties. To make an object fade from view, you animate its Opacity property.
For a property to have animation capabilities, it must meet the following three requirements:
It must be a dependency property.
It must belong to a class that inherits from DependencyObject and implements the IAnimatable interface.
There must be a compatible animation type available.
Double Animation: One way to make an element fade in and out of view is to animate its Opacity property. Because the Opacity property is of type Double, you need an animation that produces double values. A DoubleAnimation is one such animation. DoubleAnimation creates a transition between two double values. To specify its starting and ending values, you set its From and To properties, respectively. Recall that an opacity value of 1.0 makes the object completely opaque, and an opacity value of 0.0 makes it completely invisible. To make the animation transition from 1.0 to 0.0 you set its From property to 1.0 and its To property to 0.0. With DoubleAnimation you also need a duration value which specifies how long it takes to go from its starting value to its destination value. For example:
<DoubleAnimation From="1.0" To="0.0" Duration="0:0:5" />
Storyboard: DoubleAnimation element above does not specify which element and which property on that element is to be animated. This information and other supporting information is specified in a Stroyboard element. Storyboard objects provide one way to apply animations to properties. A Storyboard is a container timeline that provides targeting information for the animations it contains. Storyboard objects enable you to combine multiple timelines (DoubleAnimation, PointAnimatiobnUsingPath, ColorAnimation, etc ...) that affect a variety of objects and properties into a single timeline tree, making it easy to organize and control complex timing behaviors. Container timelines derive from the TimelineGroup class, and include ParallelTimeline and Storyboard.
The Storyboard has to know where to apply the animation. Use the Storyboard.TargetName attached property to specify the object to animate, and Storyboard.TargetProperty attached property to specify the property to animate. You begin the Storyboard using a trigger action or a method. In XAML, you use a BeginStoryboard object with an EventTrigger, Trigger, or DataTrigger. In code, you can also use the Begin method. The easiest way to apply and start a Storyboard in XAML is to use an event trigger. Create a BeginStoryboard object and associate your storyboard with it. A BeginStoryboard is a type of TriggerAction that applies and starts a Storyboard. For example:
<BeginStoryboard>
<Storyboard>
<DoubleAnimation Storyboard.TargetName="MyRectangle"
Storyboard.TargetProperty="Opacity"
From="1.0" To="0.0"
Duration="0:0:5" AutoReverse="True" />
</Storyboard>
</BeginStoryboard>
To start a storyboard in XAML, you associate it with an EventTrigger. An EventTrigger is an object that describes what actions to take when a specified event occurs. One of those actions can be a BeginStoryboard action, which you use to start your storyboard. Event triggers are similar in concept to event handlers because they enable you to specify how your application responds to a particular event. Unlike event handlers, event triggers can be fully described in XAML; no other code is required.
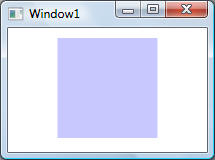
<Window x:Class="Animations.FadeInOut"
xmlns="http://schemas.microsoft.com/winfx/2006/xaml/presentation"
xmlns:x="http://schemas.microsoft.com/winfx/2006/xaml"
Title="Window1" Height="300" Width="300">
<StackPanel Margin="10">
<Rectangle Name="MyRectangle"
Width="100" Height="100" Fill="Blue">
<Rectangle.Triggers>
<!-- Animates
the rectangle's opacity. -->
<EventTrigger
RoutedEvent="Rectangle.MouseEnter">
<BeginStoryboard>
<Storyboard>
<DoubleAnimation Storyboard.TargetName="MyRectangle"
Storyboard.TargetProperty="Opacity" From="1.0" To="0.0" Duration="0:0:5"
AutoReverse="True" />
</Storyboard>
</BeginStoryboard>
</EventTrigger>
</Rectangle.Triggers>
</Rectangle>
</StackPanel>
</Window>
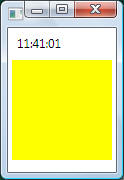
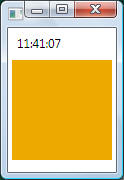
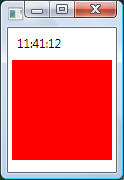
Various snapshots of the animation are shown below:
A timeline represents a segment of time. It provides properties that allow you to specify the length of that segment, when it should start, how many times it will repeat, how fast time progresses in that segment, and more. In WPF timelines are represented by classes that inherit from the abstract Timeline class, for example:
Timeline
AnimationTimeline
DoubleAnimationBase
DoubleAnimation
DoubleAnimationUsingKeyFrames
DoubleAnimationUsingPath
ColorAnimationBase
ColorAnimation
ColorAnimationUsingKeyFrames
DoubleAnimationUsingPath
and others ...
TimelineGroup
ParllelTimeline
Storyboard
MediaTimeline
Given that the length of the timeline can be described in different ways, the following table defines several terms for describing the length of a timeline:
| Term | Relevant Properties | Description |
| Simple Duration | Duration | The length of time a timeline takes to make a single forward iteration. |
| One Repetition | Duration, AutoReverse |
The length of time it takes for a timeline to play forward once and, if the AutoReverse property is true, play backwards once. |
| Active Period | Duration, AutoReverse, RepeatBehavior |
The length of time it takes for a timeline to complete all the repetitions specified by its RepeatBehavior property. |
The following is a brief overview of these properties.
The length of a timeline segment is determined by the timeline's Duration. When a timeline reaches the end of its duration, it stops playing. If the timeline has child timelines, they stop playing as well. In the case of an animation, the Duration specifies how long the animation takes to transition from its starting value to its ending value. For example:
<DoubleAnimation From="1.0" To="0.0" Duration="0:0:5" />
Container timelines, such as Storyboard and ParallelTimeline, have a default duration of Automatic, which means they automatically end when their last child stops playing.
By setting the Duration of a container timeline (succh as Storyboard) to a TimeSpan value, you can force to play longer or shorter than its child Timeline objects would play. If you set the Duration to a value that's smaller than the length of the container timeline's child Timeline objects, the child Timeline objects stop playing when the container timeline does. The following example sets the Duration of a Storyboard to three seconds. As a result, the first DoubleAnimation stops progressing after three seconds, when it has animated the target rectangle's width to 60, while the second animation finished to completion:
<Storyboard Duration="0:0:3">
<!-- Child Timeline object 1 -->
<DoubleAnimation Storyboard.TargetName="MyRectangle"
Storyboard.TargetProperty="Width"
From="0" To="100" Duration="0:0:5" />
<!-- Child Timeline object 2 -->
<DoubleAnimation Storyboard.TargetName="MyOtherRectangle"
Storyboard.TargetProperty="Width"
From="0" To="100" Duration="0:0:3" />
</Storyboard>
The RepeatBehavior property of a Timeline controls how many times it repeats its simple duration. Using the RepeatBehavior property, you can specify how many times the timeline plays (an iteration Count). By default, timelines have an iteration count of 1.0, which means they play once and do not repeat at all.
The following example uses the RepeatBehavior property to make a DoubleAnimation play for twice its simple duration by specifying an iteration count.
<DoubleAnimation Storyboard.TargetName="MyRectangle"
Storyboard.TargetProperty="Width" From="0" To="100"
Duration="0:0:5" RepeatBehavior="2x" />
If you set the RepeatBehavior property of a Timeline to Forever, the Timeline repeats until stopped interactively or by the timing system.
The AutoReverse property specifies whether a Timeline will play backwards at the end of each forward iteration. The following example sets to the AutoReverse property of a DoubleAnimation to true; as a result, it animates from zero to 100, and then from 100 to zero. It plays for a total of 10 seconds (5 seconds to animate from zero to 100 and another 5 seconds to animate from 100 to zero):
<DoubleAnimation Storyboard.TargetName="MyRectangle"
Storyboard.TargetProperty="Width"
From="0" To="100" Duration="0:0:5" AutoReverse="True" />
The following example sets the RepeatBehavior of the DoubleAnimation from the preceding example to a Count of 2. As a result, the DoubleAnimation plays for 20 seconds: forward for five seconds, backwards for five seconds, forward for 5 seconds again, and then backwards for five seconds:
<DoubleAnimation Storyboard.TargetName="MyRectangle"
Storyboard.TargetProperty="Width"
From="0" To="100" Duration="0:0:5" RepeatBehavior="2"
AutoReverse="True" />
The BeginTime property enables you to specify when a timeline starts. A timeline's begin time is relative to its parent timeline. For example, a begin time of two seconds means the timeline starts playing when its parent has reached a time of two seconds. By default, all timelines have a begin time of zero seconds. You may also set a timeline's begin time to null, which prevents the timeline from starting.
Note that the begin time is not applied each time a timeline repeats because of its RepeatBehavior setting. If you were to create an animation with a BeginTime of 10 seconds and a RepeatBehavior of Forever, there would be a 10-second delay before the animation played for the first time, but not for each successive repetition. However, if the animation's parent timeline were to restart or repeat, the 10-second delay would occur.
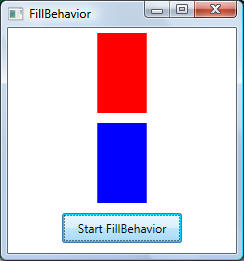
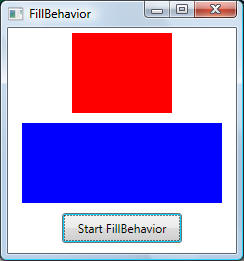
The FillBehavior property of a Timeline determines what happens to the value of an animated property when it is not being animated, that is, when the Timeline is inactive but its parent Timeline is inside its active or hold period. For example, does an animated property remain at its end value after the animation ends or does it revert back to the value it had before the animation started?
The following example creates a Storyboard that has two child DoubleAnimation objects. Both DoubleAnimation objects animate the Width of a Rectangle from 0 to 100. The Rectangle elements have non-animated Width values of 200 device independent pixels.
The FillBehavior property of the first DoubleAnimation is set to HoldEnd, the default value. As a result, the Width of the Rectangle stays at 100 after the DoubleAnimation ends.
The FillBehavior property of the second DoubleAnimation is set to Stop. As a result, the Width of the second Rectangle reverts to 500 after the DoubleAnimation ends.
The first screen below shows application on start-up, the second screen shows the application during animation, while the last screen shows the application when animation has stopped:

Because animations generate property values, different animation types exist for different property types. To animate a property that takes a Double, such as the Opacity or Width properties of an element, use an animation that produces Double values such as DoubleAnimation To animate a property that takes a Point, use an animation that produces Point values such as PointAnimation, and so on. Because of the number of different property types, there are several animation classes in the System.Windows.Media.Animation namespace. Fortunately, they follow a strict naming convention that makes it easy to differentiate between them:
<Type>Animation
Known as a "From/To/By" or "basic" animation, these animate
between a starting and destination value, or by adding an offset value to
its starting value.
<Type>AnimationUsingKeyFrames
Key frame animations are more powerful than From/To/By animations because
you can specify any number of target values and even control their
interpolation method.
<Type>AnimationUsingPath
Path animations enable you to use a geometric path in order to produce
animated values.
<Type>AnimationBase
Abstract class that, when you implement it, animates a <Type> value. This
class serves as the base class for <Type>Animation
and <Type>AnimationUsingKeyFrames classes. You
have to deal directly with these classes only if you want to create your own
custom animations.
All the animation types inherit from the Timeline class; therefore, all animations are specialized types of timelines. A Timeline defines a segment of time. You can specify the timing behaviors of a timeline: its Duration, how many times it is repeated, and even how fast time progresses for it. The length of that time segment is determined by the Duration of the timeline, which is usually specified by using a TimeSpan value. When a timeline reaches the end of its duration, it has completed an iteration.
A From/To/By animation creates a transition between a starting value and an ending value. The amount of time that the transition takes to complete is determined by the Duration of that animation. As described in Animation Types section, From/To/By animations follow the <Type>Animation naming conventions. WPF provides many From/to/By animation classes including:
ByteAnimation
ColorAnimation
DoubleAnimation
Int32Animation
PointAnimation
RectAnimation
SizeAnimation
ThicknessAnimation
and others
A From/To/By animation creates a transition between two target values. It is common to specify a starting value (set it by using the From property) and an ending value (set it by using the To property). However, you can also specify only a starting value, a destination value, or an offset value. In these cases, the animation obtains the missing target value from the property that is being animated. The following list describes the different ways to specify the target values of an animation.
Starting Value: Use the From property when you want to explicitly specify the starting value of an animation. If you specify only the From property, the animation transitions from that value to the base value of the animated property.
Ending Value: To specify an ending value of an animation, use its To property. If you use the To property by itself, the animation obtains its starting value from the property that is being animated or from the output of another animation that is applied to the same property.
Offset Value: The By property enables you to specify an offset instead of an explicit starting or ending value for the animation. The By property of an animation specifies by how much the animation changes a value over its duration. If you specify only the By property, the animation adds the offset value to the base value of the property or to the output of another animation.
<Window x:Class="Animations.FromToBy1"
xmlns="http://schemas.microsoft.com/winfx/2006/xaml/presentation"
xmlns:x="http://schemas.microsoft.com/winfx/2006/xaml"
Title="FromToBy1" Loaded="Window_Loaded" Height="200"
Width="200">
<StackPanel Margin="10">
<!-- Base value
for Height is 50 and base value for Width is 50 -->
<Rectangle Name="MyRectangle"
Fill="Green" Height="50" Width="50" MouseDown="MyRectangle_MouseDown" />
</StackPanel>
</Window>
public partial class FromToBy1 : Window
{
private Storyboard _sb = null;
public FromToBy1()
{
InitializeComponent();
}
private void Window_Loaded(object sender, RoutedEventArgs e)
{
// Create a
namescope so that a storyboard can be used in this window
NameScope.SetNameScope(this,
new NameScope());
RegisterName("FromToBy1", MyRectangle);
// Create an
animation
DoubleAnimation da = new
DoubleAnimation();
da.From = 50;
// If From is omitted, animation starts from 50 (see XAML)
da.To = 150;
da.Duration = new
Duration(TimeSpan.FromSeconds(10.0));
// Create a
story board
Storyboard.SetTargetName(da,
"FromToBy1");
Storyboard.SetTargetProperty(da, new
PropertyPath(Rectangle.WidthProperty));
_sb = new Storyboard();
_sb.Children.Add(da);
}
private void MyRectangle_MouseDown(object sender,
MouseButtonEventArgs e)
{
_sb.Begin(this.MyRectangle);
}
}
Output screens at various stages of the animation are shown below:
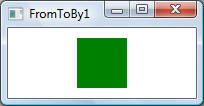

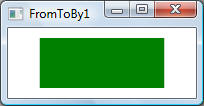
If the example does not specify a starting value, the DoubleAnimation uses the base value of the Width property, 50, as its starting value. Now if only By was specified, say 150, the ending value is determined by adding the By value of the animation, 150, to the Width starting value, 50: 200. As a result, the Width of the Rectangle is animated from 50 to 200.
Key-frame animations enable you to animate using more than two target values, and control an animation's interpolation method. While a From/To/By animation creates a transition between two values, a single key-frame animation can create transitions among any number of target values. Unlike a From/To/By animation, a key frame animation has no From, To, or By properties with which to set its target values. A key-frame animation's target values are described using key frames objects (hence the term, "key-frame animation"). To specify the animation's target values, you create key frame objects and add them to the animation's KeyFrames collection. When the animation runs, it transitions between the frames you specified.
In addition to supporting multiple target values, some key-frame methods even support multiple interpolation methods. An animation's interpolation method defines how it transitions from one value to the next. There are three types of interpolations: discrete, linear, and splined.
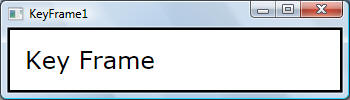
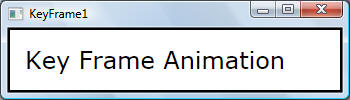
This example shows how to animate strings using key frames. The relevant animation class is StringAnimationUsingKeyFrames which animates the value of a String property along a set of KeyFrames over a specified Duration. As described above, target values for any key frame animation are defined via a collection of DiscreteStringKeyFrame elements. Each DiscreteStringKeyFrame element defines a segment of the animation with its own target value and KeyTime (KeyTime Gets or sets the time at which the key frame's target Value should be reached.). When the animation runs, it progresses from one key value to the next at the specified key times
<Window x:Class="Animations.KeyFrame1"
xmlns="http://schemas.microsoft.com/winfx/2006/xaml/presentation"
xmlns:x="http://schemas.microsoft.com/winfx/2006/xaml"
Title="KeyFrame1" Height="100" Width="350">
<Border BorderBrush="Black" BorderThickness="2">
<Label Name="lbl" Margin="10"
FontSize="24" FontFamily="Verdana" Content="Key Frame Animation">
<Label.Triggers>
<EventTrigger RoutedEvent="Label.MouseEnter">
<BeginStoryboard>
<Storyboard>
<StringAnimationUsingKeyFrames Storyboard.TargetName="lbl"
Storyboard.TargetProperty="(Label.Content)"
Duration="0:0:9" FillBehavior="HoldEnd">
<!-- All the key frames below are DiscreteStringKeyFrames. Discrete
key frames create sudden "jumps" between values (no interpolation). Only
discrete key frames can be used for String key frame animations. -->
<DiscreteStringKeyFrame Value="" KeyTime="0:0:0" />
<DiscreteStringKeyFrame Value="K" KeyTime="0:0:1" />
<DiscreteStringKeyFrame Value="Ke" KeyTime="0:0:1.5" />
<DiscreteStringKeyFrame Value="Key" KeyTime="0:0:2" />
<DiscreteStringKeyFrame Value="Key F" KeyTime="0:0:2.5" />
<DiscreteStringKeyFrame Value="Key Fr" KeyTime="0:0:3" />
<DiscreteStringKeyFrame Value="Key Fra" KeyTime="0:0:3.5" />
<DiscreteStringKeyFrame Value="Key Frame" KeyTime="0:0:4" />
<DiscreteStringKeyFrame Value="Key Frame " KeyTime="0:0:4.5" />
<DiscreteStringKeyFrame Value="Key Frame A" KeyTime="0:0:5" />
<DiscreteStringKeyFrame Value="Key Frame An" KeyTime="0:0:5.5" />
<DiscreteStringKeyFrame Value="Key Frame Ani" KeyTime="0:0:6" />
<DiscreteStringKeyFrame Value="Key Frame Anim" KeyTime="0:0:6.5" />
<DiscreteStringKeyFrame Value="Key Frame Anima" KeyTime="0:0:7" />
<DiscreteStringKeyFrame Value="Key Frame Animat" KeyTime="0:0:7.5" />
<DiscreteStringKeyFrame Value="Key Frame Animati" KeyTime="0:0:8" />
<DiscreteStringKeyFrame Value="Key Frame Animatio" KeyTime="0:0:8.5" />
<DiscreteStringKeyFrame Value="Key Frame Animation" KeyTime="0:0:9" />
</StringAnimationUsingKeyFrames>
</Storyboard>
</BeginStoryboard>
</EventTrigger>
</Label.Triggers>
</Label>
</Border>
</Window>
A few screen outputs are shown below:

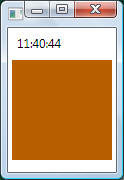
This example shows how to animate colors using key frames. The relevant animation class is ColorAnimationUsingKeyFrames which animates the value of a Color property along a set of KeyFrames over a specified Duration. As described above, target values for any key frame animation are defined via a collection of ColorKeyFrame elements. Each ColorKeyFrame defines a segment of the animation with its own target Value and KeyTime. When the animation runs, it progresses from one key value to the next at the specified key times.
Note that there are three types of ColorKeyFrame classes, one for each supported interpolation method: LinearColorKeyFrame, DiscreteColorKeyFrame, and SplineColorKeyFrame:
DiscreteColorKeyFrame
Animates from the Color value of the previous
key frame to its own Value using discrete
interpolation. Discrete key frames like
DiscreteColorKeyFrame create sudden "jumps" between values (no
Interpolation). In other words, the animated property does not change until
the key frame's key time is reached at which point the animated property
goes suddenly to the target value.
LinearColorKeyFrame
Animates from the Color value of the previous
key frame to its own Value using linear
interpolation. For example, if the previous Color
was Red and the Color value for the current linear
key frame is Green, then the Color will gradually
change from Red to Green over the specified key time. Linear interpolation
creates a smooth linear transition between values.
SplineColorKeyFrame.
Animates from the Color value of the previous key
frame to its own Value using splined interpolation.
Splined interpolation can be used to achieve more realistic "real world" timing
effects such as acceleration and deceleration.
<Window x:Class="Animations.KeyFrame2"
xmlns="http://schemas.microsoft.com/winfx/2006/xaml/presentation"
xmlns:x="http://schemas.microsoft.com/winfx/2006/xaml"
Width="110" Height="180"
Title="KeyFrame2">
<StackPanel Orientation="Vertical" HorizontalAlignment="Center">
<Label Name="lblTime" Content="Time"
Margin="2"></Label>
<Rectangle Width="100" Height="100"
Margin="2">
<!-- Note how
Fill is declared in order to explicitly specify the Color attribute -->
<Rectangle.Fill>
<SolidColorBrush x:Name="MyAnimatedBrush" Color="Green" />
</Rectangle.Fill>
<Rectangle.Triggers>
<!-- Storyboard starts on a MouseEnter event -->
<EventTrigger RoutedEvent="Rectangle.MouseEnter">
<BeginStoryboard>
<Storyboard>
<!-- Animate from green to red using a linear key frame, from red to
yellow using a discrete key frame, and from yellow back to green with
a spline key frame. This animation repeats forever. -->
<ColorAnimationUsingKeyFrames
Storyboard.TargetProperty="Color" Storyboard.TargetName="MyAnimatedBrush"
FillBehavior="HoldEnd" RepeatBehavior="Forever">
<ColorAnimationUsingKeyFrames.KeyFrames>
<!-- Go from green to red in the first 5 seconds. LinearColorKeyFrame creates
a smooth, linear animation between values. -->
<LinearColorKeyFrame Value="Red" KeyTime="0:0:5"/>
<!-- In the next 5 seconds, go to yellow. DiscreteColorKeyFrame creates a
sudden jump between values. -->
<DiscreteColorKeyFrame Value="Yellow" KeyTime="0:0:10"/>
<!-- In the final 5 seconds of the animation, go from yellow back to green.
SplineColorKeyFrame creates a variable transition between values depending
on the KeySpline property. In this example, the animation starts off slow
but toward the end of the time segment, it speeds up exponentially.-->
<SplineColorKeyFrame Value="Green" KeyTime="0:0:15" KeySpline="0.6,0.0
0.9,0.00"/>
</ColorAnimationUsingKeyFrames.KeyFrames>
</ColorAnimationUsingKeyFrames>
</Storyboard>
</BeginStoryboard>
</EventTrigger>
</Rectangle.Triggers>
</Rectangle>
</StackPanel>
</Window>
Screen outputs at different times are shown below:


Path animations are useful for animation an object along a complex path. Instead of setting a From, To, or By property or using key frames, you define a geometric path and use it to set the PathGeometry property of the path animation. As the path animation progresses, it reads the x, y, and angle information from the path and uses that information to generate its output. Therefore, path animation is an animation that uses PathGeometry as its input
Path animation classes use the following naming convention:
<Type>AnimationUsingPath
where <Type> is the type of value that the class animates. WPF provides the following path animation classes:
| Path Animation Class | Description |
| DoubleAnimationUsingPath |
Generates double values from its PathGeometry. By setting the Source property, you can specify whether the DoubleAnimationUsingPath uses the x-coordinate, y-coordinate, or angle of the path as its output. |
| PointAnimationUsingPath |
Generates Point values from the x- and y-coordinates of its PathGeometry. By using a PointAnimationUsingPath to animate a property that takes Point values, you can move an object along a path. A PointAnimationUsingPath cannot rotate object. |
| MatrixAnimationUsingPath |
Generates Matrix values from its PathGeometry. When used with a MatrixTransform, a MatrixAnimationUsingPath can move an object along a path. If you set the DoesRotateWithTangent property of the MatrixAnimationUsingPath to true, it also rotates the object along the curves of the path. |
Each of the classes above has a PathGeometry property for specifying its input. PathGeometry class is covered in more detail in the Graphics chapter.
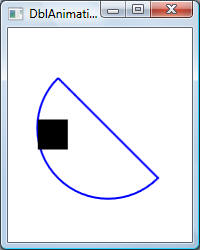
The following example uses two DoubleAnimationUsingPath objects to move a rectangle along a geometric path.
<Window x:Class="Animations.DblAnimationUsingPath"
xmlns="http://schemas.microsoft.com/winfx/2006/xaml/presentation"
xmlns:x="http://schemas.microsoft.com/winfx/2006/xaml"
xmlns:PresentationOptions="http://schemas.microsoft.com/winfx/2006/xaml/presentation/options"
Title="DblAnimationUsingPath" Height="250" Width="200">
<Window.Resources>
<!-- This is
the geometry that creates the animation path. Because
this example uses it multiple times,
it's declared as a resource and
frozen to improve performance. -->
<PathGeometry x:Key="AnimationPath2"
PresentationOptions:Freeze="True">
<PathGeometry.Figures>
<PathFigure StartPoint="50,50">
<ArcSegment Point="150,150" Size="50,50"/>
<LineSegment Point="50,50" />
</PathFigure>
</PathGeometry.Figures>
</PathGeometry>
</Window.Resources>
<Canvas>
<!-- Draw the
path along which the animation will take place. This is not
required for the animation and is
only for illustration purposes -->
<Path Stroke="Blue"
StrokeThickness="2" Data="{StaticResource AnimationPath2}" />
<!-- The object
to animate. Note the pattern of specifying which kind of
transform will be animated (rotate,
skew, scale, or translate) along
with a name that will be referenced
by animation class(es)-->
<Rectangle Width="30"
Height="30" Fill="Black">
<Rectangle.RenderTransform>
<TranslateTransform x:Name="AnimatedTranslateTransform"
/>
</Rectangle.RenderTransform>
<Rectangle.Triggers>
<EventTrigger RoutedEvent="Path.Loaded">
<BeginStoryboard>
<Storyboard RepeatBehavior="Forever">
<!-- Animates the rectangle horizontally along the path. The first
DoubleAnimationUsingPath
animates the X of the TranslateTransform applied to the rectangle. It makes the
rectangle
move horizontally along the path -->
<DoubleAnimationUsingPath Storyboard.TargetName="AnimatedTranslateTransform"
Storyboard.TargetProperty="X"
PathGeometry="{StaticResource AnimationPath2}"
Source="X" Duration="0:0:5" />
<!-- Animates the rectangle vertically along the path. The
second DoubleAnimationUsingPath
animates the Y of the TranslateTransform applied to the rectangle. It makes the
rectangle
move vertically along the path-->
<DoubleAnimationUsingPath Storyboard.TargetName="AnimatedTranslateTransform"
Storyboard.TargetProperty="Y"
PathGeometry="{StaticResource AnimationPath2}"
Source="Y" Duration="0:0:5" />
</Storyboard>
</BeginStoryboard>
</EventTrigger>
</Rectangle.Triggers>
</Rectangle>
</Canvas>
</Window>
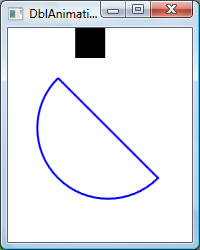
The following screens show the animation at various stages where the rectangle moves along the given path:
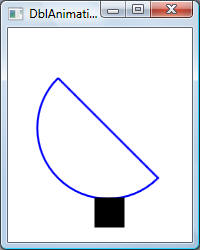
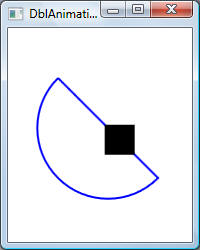
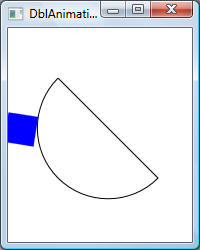
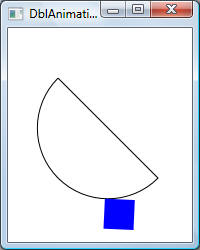
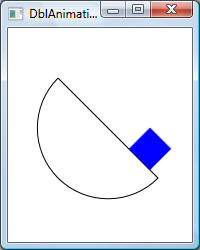
If the second animation was commented out, the rectangle will move horizontally along the x-axis as shown in the first plot below. If the first animation was commented out, the rectangle will move vertically along the y-axis as shown in the second plot:

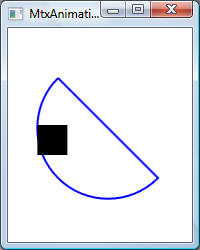
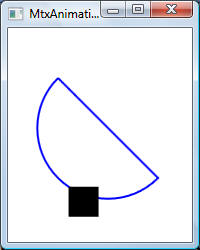
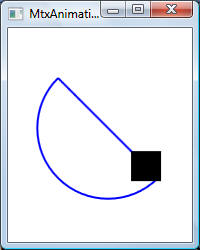
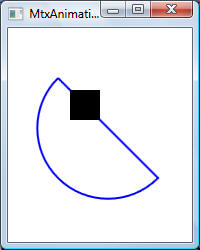
The following example uses a MatrixAnimationUsingPath object to move a rectangle along a geometric path by doing the following:
Applies a MatrixTransform to the object in order to move it.
Defines the path by using a PathGeometry.
Creates a MatrixAnimationUsingPath and uses it to animate the Matrix property of the MatrixTransform. The MatrixAnimationUsingPath takes the PathGeometry and uses it to generate Matrix values.
<Window x:Class="Animations.MtxAnimationUsingPath"
xmlns="http://schemas.microsoft.com/winfx/2006/xaml/presentation"
xmlns:x="http://schemas.microsoft.com/winfx/2006/xaml"
xmlns:PresentationOptions="http://schemas.microsoft.com/winfx/2006/xaml/presentation/options"
Title="MtxAnimationUsingPath" Height="250" Width="200">
<Window.Resources>
<!-- This is
the geometry that creates the animation path. Because
this example uses it multiple times,
it's declared as a resource and
frozen to improve performance. -->
<PathGeometry x:Key="AnimationPath2"
PresentationOptions:Freeze="True">
<PathGeometry.Figures>
<PathFigure StartPoint="50,50">
<ArcSegment Point="150,150" Size="50,50"/>
<LineSegment Point="50,50" />
</PathFigure>
</PathGeometry.Figures>
</PathGeometry>
</Window.Resources>
<Canvas>
<!-- Draw the
path along which the animation will take place-->
<Path Stroke="Blue"
StrokeThickness="2" Data="{StaticResource AnimationPath2}" />
<!-- The object
to animate. Note the pattern of specifying which kind of
transform will be animated (rotate,
skew, scale, or translate) along
with a name that will be referenced
by animation class(es)-->
<Rectangle Width="30"
Height="30" Fill="Black">
<Rectangle.RenderTransform>
<MatrixTransform x:Name="AnimatedMatrixTransform" />
</Rectangle.RenderTransform>
<Rectangle.Triggers>
<EventTrigger RoutedEvent="Path.Loaded">
<BeginStoryboard>
<Storyboard RepeatBehavior="Forever">
<!-- Animates the rectangle horizotally along the path.
-->
<MatrixAnimationUsingPath Storyboard.TargetName="AnimatedMatrixTransform"
Storyboard.TargetProperty="Matrix"
PathGeometry="{StaticResource AnimationPath2}"
Duration="0:0:5"/>
</Storyboard>
</BeginStoryboard>
</EventTrigger>
</Rectangle.Triggers>
</Rectangle>
</Canvas>
</Window>
Results which are identical to DoubleAnimationUsingPath are shown below:
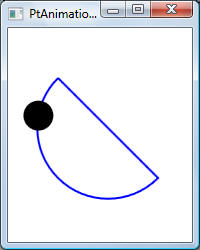
<Window x:Class="Animations.PtAnimationbUsingPath"
xmlns="http://schemas.microsoft.com/winfx/2006/xaml/presentation"
xmlns:x="http://schemas.microsoft.com/winfx/2006/xaml"
xmlns:PresentationOptions="http://schemas.microsoft.com/winfx/2006/xaml/presentation/options"
Title="PtAnimationbUsingPath" Height="250" Width="200">
<Window.Resources>
<!-- This is
the geometry that creates the animation path. Because
this example uses it multiple times,
it's declared as a resource and
frozen to improve performance. -->
<PathGeometry x:Key="AnimationPath2"
PresentationOptions:Freeze="True">
<PathGeometry.Figures>
<PathFigure StartPoint="50,50">
<ArcSegment Point="150,150" Size="50,50"/>
<LineSegment Point="50,50" />
</PathFigure>
</PathGeometry.Figures>
</PathGeometry>
</Window.Resources>
<Canvas Width="400" Height="400">
<!-- Draw the
path along which the animation will take place-->
<Path Stroke="Blue"
StrokeThickness="2" Data="{StaticResource AnimationPath2}" />
<Path Fill="Black">
<!-- Path.Data is used to specify a Geometry to define the shape of the path -->
<Path.Data>
<!-- The EllipseGemetry specifies the shape and position of the Ellipse. The
Center property is animated, causing the Ellipse to animate across the screen-->
<EllipseGeometry x:Name="MyAnimatedEllipseGeometry" Center="10,100" RadiusX="15"
RadiusY="15" />
</Path.Data>
<!-- The following sections are used to define and invoke a storyboard -->
<Path.Triggers>
<EventTrigger RoutedEvent="Path.Loaded">
<BeginStoryboard Name="MyBeginStoryboard">
<Storyboard>
<!-- Animates the ellipse along the path. -->
<PointAnimationUsingPath Storyboard.TargetName="MyAnimatedEllipseGeometry"
Storyboard.TargetProperty="Center"
Duration="0:0:5"
RepeatBehavior="Forever" PathGeometry="{StaticResource AnimationPath2}">
</PointAnimationUsingPath>
</Storyboard>
</BeginStoryboard>
</EventTrigger>
</Path.Triggers>
</Path>
</Canvas>
</Window>
Results which are identical to both examples above are shown below:
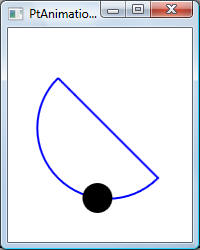
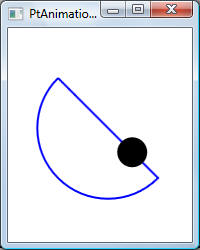
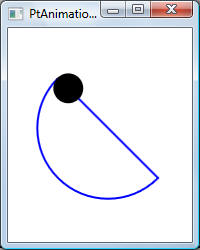
The following example uses three DoubleAnimationUsingPath objects to move a rectangle along a geometric path.
The first DoubleAnimationUsingPath animates a RotateTransform that is applied to the rectangle. The animation generates angle values. It makes the rectangle rotate (pivot) along the contours of the path.
The other two objects animate the X and Y values of a TranslateTransform that is applied to the rectangle. They make the rectangle move horizontally and vertically along the path.
<Window x:Class="Animations.DblAnimationUsingPath2"
xmlns="http://schemas.microsoft.com/winfx/2006/xaml/presentation"
xmlns:x="http://schemas.microsoft.com/winfx/2006/xaml"
xmlns:PresentationOptions="http://schemas.microsoft.com/winfx/2006/xaml/presentation/options"
Title="DblAnimationUsingPath2" Height="250" Width="200">
<Window.Resources>
<!-- This is
the geometry that creates the animation path. Because
this example uses it multiple times,
it's declared as a resource and
frozen to improve performance. -->
<PathGeometry x:Key="AnimationPath2"
PresentationOptions:Freeze="True">
<PathGeometry.Figures>
<PathFigure StartPoint="50,50">
<ArcSegment Point="150,150" Size="50,50"/>
<LineSegment Point="50,50" />
</PathFigure>
</PathGeometry.Figures>
</PathGeometry>
</Window.Resources>
<Canvas >
<!-- Draws the
actual path along which the object will be animated -->
<Path Stroke="Black" Data="{StaticResource
AnimationPath2}" />
<!-- The object
to animate. -->
<Rectangle Width="30"
Height="30" Fill="Blue">
<Rectangle.RenderTransform>
<TransformGroup>
<RotateTransform x:Name="AnimatedRotateTransform" />
<TranslateTransform x:Name="AnimatedTranslateTransform" />
</TransformGroup>
</Rectangle.RenderTransform>
<Rectangle.Triggers>
<EventTrigger RoutedEvent="Path.Loaded">
<BeginStoryboard>
<Storyboard RepeatBehavior="Forever" AutoReverse="True" >
<!-- Generates angle values (in degrees) from the path. This animation is
used to rotate the rectangle. -->
<DoubleAnimationUsingPath Storyboard.TargetName="AnimatedRotateTransform"
Storyboard.TargetProperty="Angle"
PathGeometry="{StaticResource AnimationPath2}"
Source="Angle"
Duration="0:0:5" />
<!-- Generates horizontal offset values from the path. This animation is
used to animate the rectangle horizontally. -->
<DoubleAnimationUsingPath Storyboard.TargetName="AnimatedTranslateTransform"
Storyboard.TargetProperty="X"
PathGeometry="{StaticResource AnimationPath2}"
Source="X"
Duration="0:0:5" />
<!-- Generates vertical offset values from the path. This animation is
used to move the rectangle vertically. -->
<DoubleAnimationUsingPath Storyboard.TargetName="AnimatedTranslateTransform"
Storyboard.TargetProperty="Y"
PathGeometry="{StaticResource AnimationPath2}"
Source="Y"
Duration="0:0:5" />
</Storyboard>
</BeginStoryboard>
</EventTrigger>
</Rectangle.Triggers>
</Rectangle>
</Canvas>
</Window>
Outputs of the animation at various stages are shown below:
A timeline represents a segment of time, and as was described in Timing Overview, WPF describes a timeline using the abstract Timeline class. In WPF, an animation is described using Timeline-derived classes. By itself, a Timeline, doesn't do anything other than just describe a segment of time. It's the timeline's Clock object that does the real work. Likewise, animation doesn't actually animate properties: an animation class such as DoubleAnimation describes how output values should be calculated, but it’s the Clock that was created for the animation that drives the animation output and applies it to properties.
A Clock is a special type of object that maintains state for a Timeline-derived object. A Clock provides three bits of information that are essential to the animation and timing system: CurrentTime, CurrentProgress, and CurrentState. A Clock determines its current time, progress, and state by using the timing behaviors described by the corresponding Timeline-derived class: Duration, RepeatBehavior, AutoReverse, and so on.
In most cases, a Clock is created automatically for your timeline. When you animate by using a Storyboard or the BeginAnimation method, clocks are automatically created for your Timelime-derived object and animations and applied to their targeted properties. You can also create a Clock explicitly by using the CreateClock method of your Timeline-derived object.
When animating objects in WPF, a time manager manages the Clock objects created for your timelines. The time manager is the root of a tree of Clock objects and controls the flow of time in that tree. A time manager is automatically created for each WPF application and is invisible to the application developer. The time manager "ticks" many times per second; the actual number of ticks that occur each second varies depending on available system resources. During each one of these ticks, the time manager computes the state of all Active Clock objects in the timing tree.
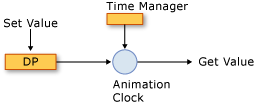
When the time manager ticks, it updates the time of every Active Clock in the application. If the Clock is an AnimationClock, it (i.e., the clock) calls AnimationTimeline.GetCurrentValue passing required input values in order to compute the next animated value. Note that when you retrieve the value of an animated by property using the GetValue method or its CLR accessor, you get the output of its AnimationClock.
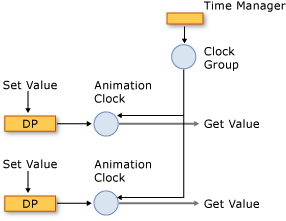
For a Storyboard, the picture is a bit different but the same concepts apply. There are different types of clocks for different types of timelines. For example, for AnimationTimeline the clock type is AnimationClock, and for Storyboard, the clock type is ClockGroup. A ClockGroup is a basically a group of child clocks managed by a master clock. For a Storyboard the picture above applies except that the animation clock consists of a GroupClock that manages one or more animation clocks:
Finally note that an animatable property can have two values: a base value and a current value:
When you set property using its CLR accessor or the SetValue method, you set its base value. When a property is not animated, its base and current values are the same.
When you animate a property, the AnimationClock sets the property's current value. Retrieving the property's value through its CLR accessor or the GetValue method returns the output of the AnimationClock when the AnimationClock is Active or Filling. You can retrieve the property's base value by using the GetAnimationBaseValue method.
This example shows how to use a Trigger to start a Storyboard when a property value changes:
<Window x:Class="Animations.Example1"
xmlns="http://schemas.microsoft.com/winfx/2006/xaml/presentation"
xmlns:x="http://schemas.microsoft.com/winfx/2006/xaml"
Title="Example1" Height="300" Width="300">
<Window.Resources>
<Style x:Key="ButtonStyle" TargetType="{x:Type
Button}">
<Setter
Property="Opacity" Value="0.25" />
<Style.Triggers>
<Trigger Property="IsMouseOver" Value="True">
<Trigger.EnterActions>
<BeginStoryboard>
<Storyboard>
<DoubleAnimation Storyboard.TargetProperty="Opacity" To="1" Duration="0:0:1" />
</Storyboard>
</BeginStoryboard>
</Trigger.EnterActions>
<Trigger.ExitActions>
<BeginStoryboard>
<Storyboard>
<DoubleAnimation Storyboard.TargetProperty="Opacity" To="0.25" Duration="0:0:1"
/>
</Storyboard>
</BeginStoryboard>
</Trigger.ExitActions>
</Trigger>
</Style.Triggers>
</Style>
</Window.Resources>
<StackPanel Margin="20">
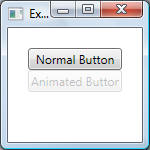
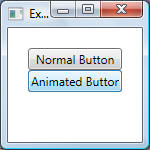
<Button Content="Normal Button" />
<Button Content="Animated Button"
Style="{StaticResource ButtonStyle}" />
</StackPanel>
</Window>
Output is shown below:
The example above showed how to use a Trigger to start a Storyboard when a property value changes. You can also use a DataTrigger to trigger an animation when a data value changes. The overall pattern is:
...
<Style.Triggers>
<DataTrigger Binding="{Binding XPath=@Stock}"
Value="out">
<DataTrigger.EnterActions>
<BeginStoryboard>
<Storyboard>
<DoubleAnimation Storyboard.TargetProperty="Opacity" From="0.25" To="0.5"
Duration="0:0:1"
RepeatBehavior="Forever" AutoReverse="True"/>
</Storyboard>
</BeginStoryboard>
</DataTrigger.EnterActions>
<DataTrigger.ExitActions>
<BeginStoryboard>
<Storyboard FillBehavior="Stop">
<DoubleAnimation Storyboard.TargetProperty="Opacity" To="1" Duration="0:0:1" />
</Storyboard>
</BeginStoryboard>
</DataTrigger.ExitActions>
</DataTrigger>
</Style.Triggers>
...
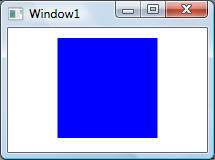
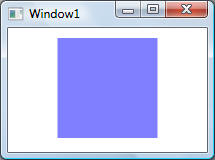
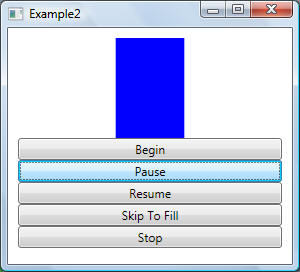
The following example shows how to interactively control a storyboard. It shows how to start, pause, resume, skip to the end, and stop a storyboard:
<Window x:Class="Animations.Example2"
xmlns="http://schemas.microsoft.com/winfx/2006/xaml/presentation"
xmlns:x="http://schemas.microsoft.com/winfx/2006/xaml"
Title="Example2" Height="300" Width="300">
<StackPanel Margin="10">
<!-- Object to be animated -->
<Rectangle Name="MyRectangle" Width="10" Height="100" Fill="Blue"/>
<!-- Buttons to control animation -->
<Button Name="BeginButton" Content="Begin"/>
<Button Name="PauseButton" Content="Pause"/>
<Button Name="ResumeButton">Resume</Button>
<Button Name="SkipToFillButton">Skip To Fill</Button>
<Button Name="StopButton">Stop</Button>
<!-- Event
triggers. These can be considered as XAML-version of an event handler.
Note: In order to control the
storyboard, all event triggers must be under the same
Triggers collection. Placing an
EventTrigger element for each button and controlling
the animation from there will not
work -->
<StackPanel.Triggers>
<EventTrigger RoutedEvent="Button.Click" SourceName="BeginButton">
<BeginStoryboard Name="MyBeginStoryboard">
<Storyboard AutoReverse="True">
<DoubleAnimation Storyboard.TargetName="MyRectangle"
Storyboard.TargetProperty="(Rectangle.Width)"
From="10" To="200" Duration="0:0:3" />
</Storyboard>
</BeginStoryboard>
</EventTrigger>
<EventTrigger RoutedEvent="Button.Click" SourceName="PauseButton">
<PauseStoryboard BeginStoryboardName="MyBeginStoryboard" />
</EventTrigger>
<EventTrigger RoutedEvent="Button.Click" SourceName="ResumeButton">
<ResumeStoryboard BeginStoryboardName="MyBeginStoryboard" />
</EventTrigger>
<EventTrigger RoutedEvent="Button.Click" SourceName="SkipToFillButton">
<SkipStoryboardToFill BeginStoryboardName="MyBeginStoryboard" />
</EventTrigger>
<EventTrigger RoutedEvent="Button.Click" SourceName="StopButton">
<StopStoryboard BeginStoryboardName="MyBeginStoryboard" />
</EventTrigger>
</StackPanel.Triggers>
</StackPanel>
</Window>
The following shows the output when the stroyboard was paused:
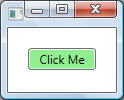
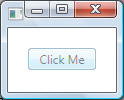
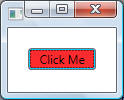
This example shows how to animate properties within a style. ]When animating within a style, only the framework element for which the style is defined can be targeted directly. In the following example, several animations are defined within a style and applied to a Button. When the user moves the mouse over the button, it fades from opaque to partially translucent and back again, repeatedly. When the user moves the mouse off the button, it becomes completely opaque. When the button is clicked, its background color changes from orange to white and back again. Because the SolidColorBrush used to paint the button can't be targeted directly, it is accessed by dotting down from the button's Background property. Recall that to target a freezable object such as SolidColorBrush , you must "dot down" from a property of the styled element.
<Window x:Class="Animations.Example3"
xmlns="http://schemas.microsoft.com/winfx/2006/xaml/presentation"
xmlns:x="http://schemas.microsoft.com/winfx/2006/xaml"
Title="Example3" Height="300" Width="300">
<Window.Resources>
<!-- Defines a
Button style. -->
<Style TargetType="{x:Type
Button}" x:Key="MyButtonStyle">
<!-- Note the
use of 'Button.Background'. Could also have used just 'Background' -->
<Setter Property="Button.Background"
Value="LightGreen"/>
<Style.Triggers>
<!-- Animates the button's opacity on mouse over. -->
<EventTrigger RoutedEvent="Button.MouseEnter">
<EventTrigger.Actions>
<BeginStoryboard>
<Storyboard>
<DoubleAnimation Storyboard.TargetProperty="(Button.Opacity)"
From="0.5" To="1.0" Duration="0:0:1" AutoReverse="True" />
</Storyboard>
</BeginStoryboard>
</EventTrigger.Actions>
</EventTrigger>
<!-- Returns the button's opacity to 1 when the mouse leaves. -->
<EventTrigger
RoutedEvent="Button.MouseLeave">
<EventTrigger.Actions>
<BeginStoryboard>
<Storyboard>
<DoubleAnimation Storyboard.TargetProperty="(Opacity)"
To="1" Duration="0:0:1" />
</Storyboard>
</BeginStoryboard>
</EventTrigger.Actions>
</EventTrigger>
<!-- Changes the button's color when clicked. Notice that the animation can't
target the
SolidColorBrush used to paint the button's background directly. The brush must
be accessed
through the
button's Background property. -->
<EventTrigger
RoutedEvent="Button.Click">
<EventTrigger.Actions>
<BeginStoryboard>
<Storyboard>
<ColorAnimation Storyboard.TargetProperty="(Button.Background).(SolidColorBrush.Color)"
From="LightBlue" To="Red" Duration="0:0:5" AutoReverse="True" />
</Storyboard>
</BeginStoryboard>
</EventTrigger.Actions>
</EventTrigger>
</Style.Triggers>
</Style>
</Window.Resources>
<StackPanel Margin="20">
<Button Style="{StaticResource
MyButtonStyle}">Click Me</Button>
</StackPanel>
</Window>
Output is shown below in the following order - MouseEnter, MouseLeave, Click:
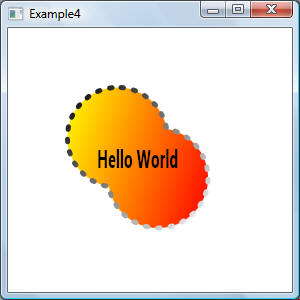
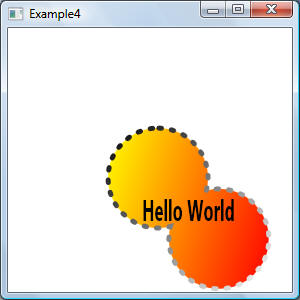
A fun example obtained from the Internet:
<Window x:Class="Animations.Example4"
xmlns="http://schemas.microsoft.com/winfx/2006/xaml/presentation"
xmlns:x="http://schemas.microsoft.com/winfx/2006/xaml"
Title="Example4" Height="300" Width="300">
<Canvas>
<!-- Path
Definition -->
<Path Name="MyPath"
Width="300" Height="300" StrokeThickness="5" StrokeDashArray="0.5,2"
StrokeDashCap="Round" >
<!-- Path is the union of two circles -->
<Path.Data>
<CombinedGeometry GeometryCombineMode="Union">
<CombinedGeometry.Geometry1>
<EllipseGeometry x:Name="MyEllipseGeometry" Center="100,100" RadiusX="50"
RadiusY="50" />
</CombinedGeometry.Geometry1>
<CombinedGeometry.Geometry2>
<EllipseGeometry x:Name="MyEllipseGeometry2" Center="150,150" RadiusX="50"
RadiusY="50" />
</CombinedGeometry.Geometry2>
</CombinedGeometry>
</Path.Data>
<!-- Path Background -->
<Path.Fill>
<VisualBrush>
<VisualBrush.Visual>
<TextBlock Text="Hello World" FontWeight="Bold" Padding="25">
<TextBlock.Background>
<LinearGradientBrush>
<GradientStop Offset="0" Color="Yellow" />
<GradientStop Offset="1" Color="Red" />
</LinearGradientBrush>
</TextBlock.Background>
</TextBlock>
</VisualBrush.Visual>
</VisualBrush>
</Path.Fill>
<!-- Path stroke colors -->
<Path.Stroke>
<LinearGradientBrush>
<GradientStop Offset="0" Color="Black" />
<GradientStop Offset="1" Color="White" />
</LinearGradientBrush>
</Path.Stroke>
<!-- Path Animations -->
<Path.Triggers>
<EventTrigger RoutedEvent="Path.Loaded">
<EventTrigger.Actions>
<BeginStoryboard>
<Storyboard>
<DoubleAnimation Storyboard.TargetName="MyPath"
Storyboard.TargetProperty="StrokeDashOffset"
To="20" Duration="0:0:10" RepeatBehavior="Forever" />
</Storyboard>
</BeginStoryboard>
<BeginStoryboard>
<Storyboard>
<PointAnimation Storyboard.TargetName="MyEllipseGeometry"
Storyboard.TargetProperty="Center" From="50,50" To="250,250" Duration="0:0:3"
RepeatBehavior="Forever" AutoReverse="True"/>
</Storyboard>
</BeginStoryboard>
</EventTrigger.Actions>
</EventTrigger>
</Path.Triggers>
</Path>
</Canvas>
</Window>
Screen shots are shown below: